
How to Install 2 Post Lift: Shop Guide
The crate is in the bay, the driver is waiting, and the temptation is to start cutting straps and standing columns. That's the moment when most bad installs begin. A shop can have the right lift and still end up with a dangerous setup because the floor, power, and layout weren't checked before the first hole was drilled.
A safe way to install 2 post lift equipment starts long before assembly. The hard part isn't usually getting the posts upright. The hard part is knowing whether the slab can hold them, whether the bay gives enough working room, and whether the finished lift will fit the vehicles the shop sees every week.
Table of Contents
- Before You Unbox Planning and Site Preparation
- The Foundation Concrete and Anchoring Essentials
- Raising the Columns Mechanical Assembly and Alignment
- Powering Up Hydraulic and Electrical Hookup
- Final Checks Safety Systems and Load Testing
- Long-Term Care and Boosting Shop Efficiency
Before You Unbox Planning and Site Preparation
The bad installs usually announce themselves before a wrench comes out. The truck drops the lift, the boxes look fine, and then somebody realizes the intended bay has a low beam, a floor drain under one baseplate, or an electrical panel that cannot support the new circuit. That is how a one-day install turns into a week of delays and shortcuts.

Start with the bay, not the box
Set the bay first. The packaging can wait.
Lay out the post locations on the floor with chalk or tape, then mark the arm sweep, vehicle centerline, door swing, technician walk paths, and anything fixed that can create trouble. Include cabinets, hose reels, floor drains, stairs, and the spot where a transmission jack or oil drain will sit during a job. A lift can fit the room and still work poorly every day.
Height planning needs the same discipline. Measure the tallest vehicle you expect to raise, then account for the lift structure, overhead shutoff area, lighting, door tracks, openers, and any hanging heater or fan. Shops get into trouble when they measure to drywall and forget the obstruction that hangs lower.
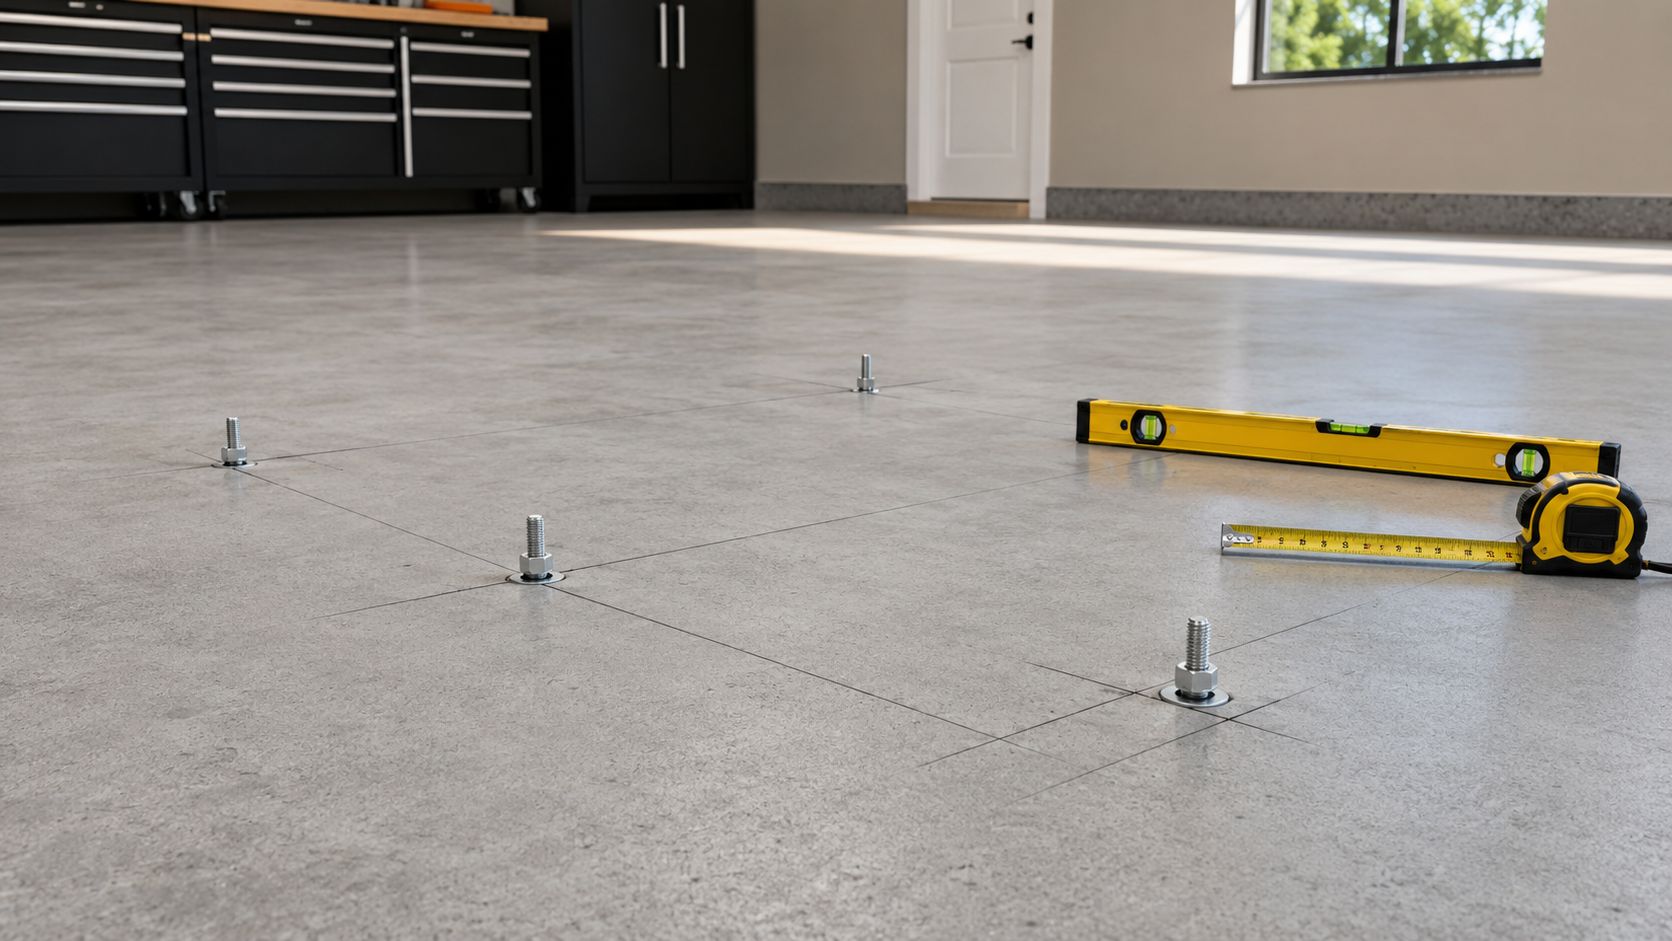
The concrete check starts here, even before the slab gets a full evaluation in the next section. Marking the exact column footprint often reveals the underlying problem. One post lands over a crack, near a control joint, beside a trench drain, or on a patched area that does not match the rest of the floor. That is the failure point many install guides skip past, and it is the one that can cost you the whole job if you catch it too late.
Plan the install like a bay operation
Good prep is less about paperwork and more about removing surprises before the lift is in pieces on the floor. I want three things settled before unboxing: the layout is final, the power plan is real, and the slab locations under both columns are known.
Use a simple checklist:
- Mark the full working envelope: Post footprint, arm travel, vehicle approach, technician standing room, and door-opening space.
- Confirm overhead conflicts: Lights, openers, tracks, beams, sprinklers, fans, and anything else above the lift path.
- Stage the actual install tools: Rotary hammer, specified bits, torque wrench, level, chalk line, shims, sockets, vacuum, and approved anchoring hardware if the manufacturer requires it separately.
- Verify code and permit requirements: Building and electrical requirements vary by area and by shop use.
- Check power capacity early: A two-post lift often needs a dedicated circuit, so panel space, breaker sizing, disconnect requirements, and wire routing need to be resolved before install day.
- Inspect the exact base locations on the slab: Cracks, saw cuts, patched concrete, drains, and uneven sections should be identified now, not after the columns are standing.
Electrical planning belongs in the main install conversation, not as an afterthought buried in a punch list. If the shop has an older service or a crowded panel, show the kind of switchboard issues that often surface when adding heavy equipment. The point applies anywhere. A lift may be mechanically ready to install while the building is not electrically ready to support it.
One more mistake is common in tight garages. The owner plans around where the posts can physically stand, then realizes there is no clean path to pull a truck in straight, open the doors, or roll equipment around the vehicle once it is in the air. That is not a minor inconvenience. It slows every job and pushes techs into awkward positions.
| Planning item | What to verify |
|---|---|
| Bay layout | Post placement, arm swing, vehicle approach, and technician movement |
| Overhead area | Lift travel, shutoff clearance, lights, tracks, beams, and openers |
| Power | Dedicated circuit planning, panel capacity, and safe routing |
| Floor surface | Cracks, joints, drains, patches, slope, and column footprint condition |
| Shop flow | Room for jacks, drains, carts, and opening vehicle doors |
| Compliance | Required permits, inspections, and electrical sign-off |
The Foundation Concrete and Anchoring Essentials
A lift install can look perfect on day one and still be unsafe if the columns are anchored into bad concrete. I have seen clean-looking slabs fail the only test that matters, which is whether they can hold anchors under repeated load without breaking out, shifting, or crushing around the base plate. That failure usually starts long before the first vehicle goes up.
Why the slab decides everything
Manufacturer minimums are only the starting point. A label that says four-inch concrete does not tell you whether the slab was poured consistently, reinforced properly, or patched after years of abuse. Two-post lifts put concentrated force into small areas at the column bases, so hidden weak spots matter more here than they do for shelves, toolboxes, or even many other pieces of shop equipment.
A common oversight is treating the top surface as the full inspection. The top can look fine while the concrete below is soft, thin, separated, or full of old repairs. If there is any doubt, verify slab thickness and condition before drilling. That can mean checking original building documents, reviewing manufacturer requirements, and using core samples or another proper evaluation method if the history of the floor is unclear.
Cracks and joints need more respect than many install guides give them. Anchor holes drilled too close to a crack, saw cut, cold joint, patch edge, or drain leave very little margin for error. Under load, the concrete can break out around the anchor or allow the column to move enough to create bad loading on the arms and locks. The slab does not have to fail dramatically to become unsafe. A small amount of movement at the base is enough to create a serious problem over time.
Concrete inspection is not a box to check. It is the step that decides whether the rest of the install deserves to happen.
What to check before a single hole is drilled
Start with the column footprint, not the whole bay in general. The question is simple. Is the concrete directly under each base plate sound enough to hold the anchors the lift manufacturer specifies?
Check for these conditions:
- Full-depth cracks that run through the planned anchor area
- Saw cuts, expansion joints, cold joints, or control joints near the base plate
- Old patching that may not bond or match the surrounding slab strength
- Surface scaling, spalling, oil saturation, or soft concrete at the top layer
- Drains, trenches, or buried utilities near the anchor zone
- Slab edges that leave too little concrete around anchor holes
If any of those show up under or near the post location, stop and reassess. Drilling anyway is how installers turn a manageable concrete problem into a failed lift bay.
What to do when the slab is not good enough
There are three honest paths.
- Cut out and repour the post areas. This is the fix I trust most when thickness or condition is questionable. Remove enough concrete to build the footing the lift needs, place proper reinforcement if the engineer or manufacturer calls for it, and let it cure fully before installation.
- Use an engineered repair designed for that exact slab condition. Steel plates, specialty anchoring systems, or epoxy-based remedies can have a place, but only when they are approved for the lift and the slab you have. They are not generic shortcuts.
- Move the lift. If the best spot in the shop sits over poor concrete, a seam, or a drain line, the right answer may be changing the layout.
The expensive mistake is trying to save a day on concrete work and living with years of doubt. For broader settlement, cracking, or slab movement, review the larger structural issues before adding anchored equipment. is a useful reference for understanding when a lift problem is really a foundation problem.
One hard lesson from shop installs is that bad concrete rarely gets better after the columns are up. It gets hidden. Then it gets loaded. Then it becomes somebody else's emergency.
Raising the Columns Mechanical Assembly and Alignment
A lot of bad lift installs look fine right up to the first vehicle rise. The posts stand upright, the anchors are tight, and the overhead bar is bolted on. Then one arm sits low, the locks do not hit together, or the car settles into a twist as it leaves the floor. That usually starts here, during assembly and alignment, not later during use.
Stand the columns with control, not speed
By this point, the slab question should already be settled. Now the job is geometry.
Set both columns on the layout marks and confirm the manufacturer's post spacing for your exact model. General spacing guidance helps with bay planning, but this is the stage where the printed lift dimensions matter more than rules of thumb. Measure between columns at the base, then measure diagonally corner to corner to verify the posts are square to each other before you commit to final anchor torque.
Dry-fitting the columns first saves rework. It also exposes problems that are easy to miss on paper, such as an overhead obstruction, a base plate landing too close to a crack repair, or an arm sweep that pinches the work area around toolboxes and door openings.
Use two people if you can.
One person controls the column and watches pinch points. The other keeps the base plate on layout, checks hole alignment, and makes sure the post does not shift as hardware goes in. Heavy columns do not forgive casual handling, and a rushed stand-up can chip concrete edges or pull the post off your marks before you notice.
Build alignment around how the lift carries load
A two-post lift does not care whether the columns look pretty from the shop entrance. It cares whether both sides share the load correctly.
That means checking more than plumb. The columns need to be in proper relation to each other, the carriages need to travel evenly, and the pad heights need to agree side to side. If one post is forced into position with a sloppy shim stack, the lift may still assemble, but the anchors, base plate, and concrete below that post will see uneven stress every time a vehicle goes up.
I have seen installers chase perfect plumb on one column and create a worse problem across the pair. Parallel columns and even lifting geometry matter more than cosmetic perfection.
A thin, intentional shim pack is normal. A tall stack says the floor or layout is still wrong.
Shim with a limit and a reason
Shims correct minor floor variation. They do not repair a poor slab, a bad layout, or a column that was pulled out of position during anchoring.
Place shims where the manufacturer allows them, keep them fully supported under the base plate, and recheck alignment after each adjustment. If the post needs excessive shimming to stand correctly, stop and find out why. That usually points back to a floor issue that should have been fixed before the steel went up.
The same discipline applies to anchor tightening. Snug the anchors enough to hold position while you verify alignment, then torque them in the proper sequence after the columns are where they belong. If you fully tighten one side too early, the post can lock in a small twist that shows up later as uneven arm height, carriage drag, or lock timing problems.
A practical alignment sequence that prevents headaches
A clean install usually follows this order:
- Set both columns on the confirmed layout.
- Install anchors loosely enough to allow small corrections.
- Measure base spacing and diagonal squareness.
- Assemble the overhead or floorplate structure per the lift design.
- Check that the columns stay parallel as the structure ties them together.
- Shim only where needed to remove tilt or rocking at the base.
- Run the carriages and confirm both sides travel evenly.
- Torque anchors and structural hardware only after the whole system agrees.
That last point matters more than many guides admit. Assembly changes alignment. Tightening one connection can move another. A lift should be treated as a system during installation, not as two posts and a bar that happen to bolt together.
Done right, this stage gives you a lift that rises evenly, locks consistently, and does not spend its first year fighting the slab under it.
Powering Up Hydraulic and Electrical Hookup
A lot of lifts get blamed for problems that started at the panel or at a pipe thread. The columns can be square, the anchors can be right, and the lift will still act unreliable if the motor is starved for power or the hydraulic side pulls air and seeps oil from the first run.
Start with the nameplate and the manual for the exact unit in front of you. Many 2 post lifts call for a dedicated 220V circuit, and that requirement exists for a reason. Lift motors draw hard on startup. Put them on a shared circuit, feed them through undersized wire, or ask an old breaker to do one more job, and you get nuisance trips, slow starts, hot wiring, and shortened motor life. A licensed electrician should size the circuit, wire the disconnect, and confirm code compliance.
Placement matters too. Put the power unit where a tech can reach the controls without stepping into a bad position under a vehicle, and where fluid checks are easy enough that they get done. I have seen clean installs ruined by a control box mounted where a door edge, hose reel, or rolling jack could tag it every week. Electrical work should survive the bay, not just pass inspection on day one.
Outdoor or semi-open installations need extra caution. Moisture, washdown, temperature swings, and UV exposure are hard on wiring, switches, and hydraulic components. If the lift is not specifically set up for that environment, an indoor bay is the safer choice.
The hydraulic side deserves the same care you would give brake plumbing. Hose routing should stay clear of moving parts, sharp edges, and foot traffic. A hose that rubs lightly on steel during every cycle is already on its way to failure. A twisted hose can also fight you during installation by loading the fitting and creating a leak that looks like bad threads.
A cleaner hookup sequence looks like this:
- Mount the power unit solidly: It should not flex or vibrate against the column during operation.
- Route hoses with full travel in mind: Check them at the floor, mid-rise, and full height so they do not stretch, kink, or chafe.
- Seal threaded fittings only as the manufacturer specifies: Some fittings want thread sealant or tape, and some do not. Using the wrong seal method can cause leaks or contaminate the system.
- Fill with the correct hydraulic fluid: Wrong fluid can affect seal life and cold-weather performance.
- Run the lift unloaded for the first cycles: Raise, lower, pause, and watch how both sides behave before a vehicle ever goes near it.
- Inspect every fitting by hand and by sight: A shiny film around a fitting is an early warning, not something to ignore until later.
Bleeding air out of the system takes patience. Jerky travel, chatter, or a pump sound that changes pitch usually means the system still has air or is pulling it from a loose connection. Slow cycles help. So does stopping to recheck the fluid level after the cylinders and lines fill completely.
One more hard-earned tip. Fix small leaks immediately. Hydraulic oil on the floor turns a new installation into a slip hazard, collects dirt, and makes future leak tracing harder because everything ends up wet. A dry system is easier to trust, easier to service, and far more likely to stay that way if the hookup was done carefully the first time.
Final Checks Safety Systems and Load Testing
A lift can run up and down and still be unsafe. I have seen brand-new installs look fine until the first loaded cycle shows a shifting arm, a lock that does not catch cleanly, or a base plate that starts telegraphing movement into the slab. The last stage is where you confirm the machine and the concrete are behaving together, because that joint is where bad installs usually reveal themselves.
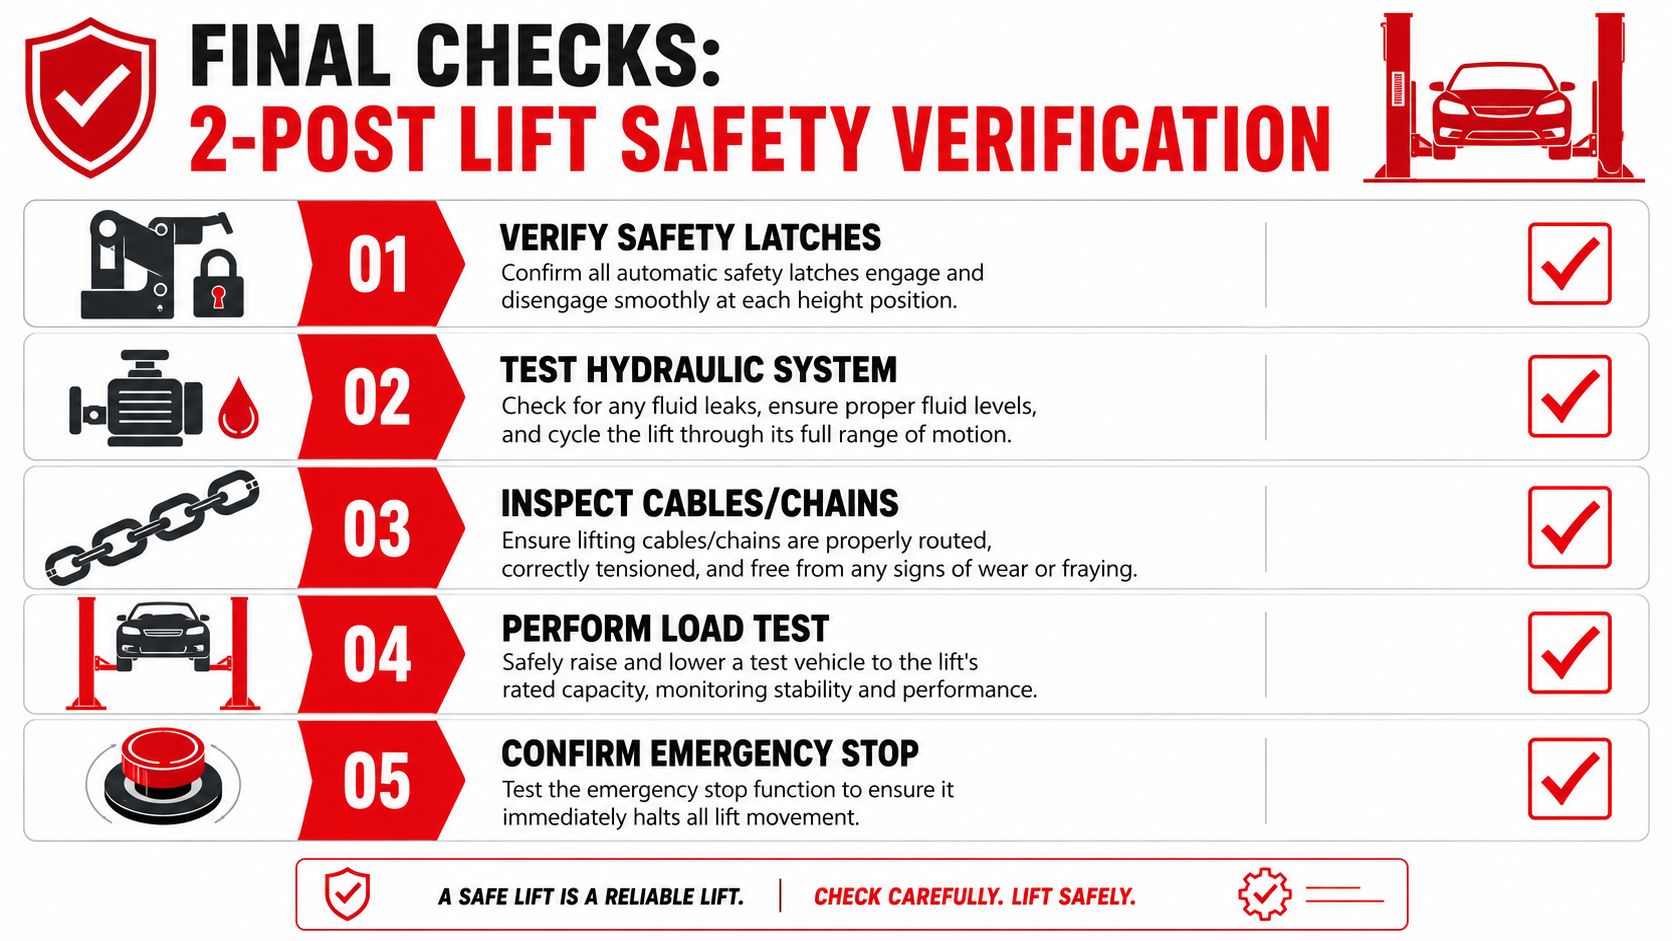
The checks that can't be skipped
Start at the floor. Look closely at both base plates and the concrete around every anchor. Hairline cracking, spalling, crushed surface paste, or a washer that no longer sits flat can mean the anchor is loading the slab unevenly. That is the failure many install guides rush past. If the column was shimmed poorly, if the hole edge broke out, or if the slab was weaker than it looked during layout, the problem often shows up now, not during assembly.
Final anchor torque happens only after the columns are plumb and fully supported. If a base plate rocks, fix that before calling the install done. Tightening harder will not pull a bad footing into compliance. It usually damages the concrete and hides the underlying problem for a little while.
Then check the safety systems by hand, one at a time.
- Arm restraints: Each restraint should engage positively and resist rotation when force is applied to the arm.
- Mechanical locks: Both sides should catch evenly through the lift range and release without sticking.
- Equalization system: Cables or chains should track cleanly, with no jump, twist, or visible imbalance side to side.
- Hydraulic system: Fittings stay dry after repeated cycles, especially at full rise and during descent.
- Columns and base plates: No creeping, no change at the shims, no new cracking in the slab.
One simple shop test tells you a lot. Put body weight on each arm and try to move it once the restraint is supposed to be locked. If an arm restraint hesitates, skips, or partly engages, stop there and correct it before any vehicle goes on the lift.
A lift that passes a no-load cycle has only cleared the easiest part of the job.
How to test before the first real job
Use a vehicle you know well, preferably one with clear factory lift points and a weight well within the lift's capacity. Set the pads carefully, raise the vehicle a few inches, and stop. This is the best moment to confirm pad contact, arm angle, vehicle balance, and whether the restraints are still fully engaged after the load settles.
Keep the first test slow and staged.
| Checkpoint | What matters |
|---|---|
| First few inches off the floor | Pads stay centered, arms do not walk, vehicle stays balanced |
| Low lock position | Locks catch correctly, no sudden side-to-side lean appears |
| Mid-height stop | Columns stay stable, equalization stays even, no binding or snap in the system |
| Near working height | Base plates remain planted, shims do not shift, concrete shows no distress |
| Full lowering cycle | Lift descends smoothly, locks release properly, no fresh leaks appear |
During that first loaded cycle, keep looking back at the concrete. A lot of installers focus on the car and forget the slab. If the floor starts cracking at an anchor, if a shim slips, or if one post shows even slight movement at the base, unload the lift and correct the foundation issue before it gets worse. That is how you prevent the most common dangerous failure. The lift is only as trustworthy as the concrete holding it.
Long-Term Care and Boosting Shop Efficiency
A new lift changes the flow of the shop on day one. It opens undercar access, increases bay flexibility, and lets technicians do work that was awkward or impossible before. It also creates a new maintenance responsibility. A lift that's ignored after installation won't stay precise for long.
The lift is installed, now protect the investment
The smartest habit is a simple inspection rhythm. No complicated form is required. What matters is consistency and the discipline to stop using the lift when something feels wrong.
- Daily checks: Look at the arm locks, pads, visible hose condition, and the floor around the base plates for new cracking or movement.
- Weekly checks: Listen for changes in operation, inspect hardware visually, and confirm smooth lock engagement.
- Monthly checks: Review anchor condition, cable or chain tracking, carriage movement, and hydraulic seepage points.
Shops should also keep the bay around the posts clean. Dirt, dropped hardware, and fluid residue hide problems. A tidy base plate area makes it easier to notice movement, cracking, or loosening early.
A lift rarely fails without warning. People usually miss the warning.
More capacity only helps if the shop can manage it
Adding a lift usually means the shop can process more work, but capacity only turns into profit when scheduling, approvals, and invoicing keep pace. Many shops install equipment and then realize the front counter is still the bottleneck.

That's where better process starts to matter as much as better equipment. Shops that want to tighten job flow, keep the board organized, and reduce handoff friction can review example features built for repair shop workflow. The point isn't software for its own sake. The point is making sure the new bay capacity doesn't get wasted by paper estimates, weak scheduling, or missed customer follow-up.
A lift expands what a shop can do physically. Strong systems decide whether that extra capability turns into cleaner operations and better throughput.
A new lift is a big upgrade, but the shops that benefit most usually upgrade the workflow around it at the same time. If the goal is to pair better bay capacity with better scheduling, digital inspections, invoicing, and shop visibility, take a look at RedAppy or reach out through the contact page.
Ready to Transform Your Shop?
RedAppy helps auto repair shops create professional digital estimates with photos and videos, send them instantly via text or email, and get customer approvals in seconds. No credit card required to start.