
Serpentine Belt Routing Diagram: Pro Reference 2026
A tow-in with a shredded belt can throw off the whole morning. The customer wants the car back fast, the tech has a bay tied up, and the old belt is in pieces on the splash shield with no clear path left to follow. If the under-hood sticker is gone or covered in grime, a simple belt job turns into a routing puzzle that can waste labor time and create an easy comeback.
That's why a serpentine belt routing diagram matters more than commonly appreciated. The belt itself is simple. The system around it isn't. One wrong pass around an idler, one ribbed section touching the wrong pulley face, or one missed tensioner issue can leave the car squealing, charging poorly, overheating, or back on a hook.
In a busy shop, the job isn't just replacing a belt. The job is finding the correct path quickly, reading the diagram correctly, confirming every pulley is healthy, and finishing the repair in a way that protects margin. Fast is good. Fast and right is what keeps the schedule clean.
Table of Contents
- Introduction The Critical Puzzle Under the Hood
- Where to Find the Correct Serpentine Belt Diagram
- How to Read Any Serpentine Belt Routing Diagram
- Common Serpentine Belt Routing Configurations
- Identifying Tensioners and Idler Pulleys Correctly
- Shop Notes for Serpentine Belt Replacement
- Troubleshooting Common Belt Routing Issues
- Serpentine Belt Diagram and Replacement FAQ
Introduction The Critical Puzzle Under the Hood
The usual version goes like this. A vehicle comes in with the belt already off, or worse, half of it wrapped around the crank pulley and the rest missing. The alternator isn't charging, power steering assist is gone on hydraulic setups, and the customer says the noise started suddenly. There's no usable belt left to trace, and nobody can trust memory on a crowded engine bay.
That's where discipline matters. A serpentine belt routing diagram isn't a convenience item. It's the reference that decides whether the job ends with a clean handoff or a comeback.
Why the diagram matters in the bay
A single serpentine belt drives multiple accessories from the crankshaft pulley. Depending on the engine layout, that can include the alternator, water pump, A/C compressor, power steering pump, idlers, and one or more tensioners. The routing determines belt wrap, pulley contact, and accessory function.
When the routing is wrong, the system usually tells on itself immediately. The belt can walk, chirp, shred, or jump a pulley. Sometimes the engine starts and runs just long enough to fool a rushed tech before the problem shows up under load.
Practical rule: If the original belt path can't be verified, the job isn't ready for installation.
Why this matters for shop profit
Belt work looks routine on the estimate. It stops being routine when the tech spends extra time hunting diagrams, reinstalling a belt twice, or replacing a new belt that got damaged by a missed misalignment issue. Shops don't lose money on hard jobs alone. They lose money on simple jobs done sloppily.
A good process fixes that. Find the correct diagram first. Confirm the pulley set matches the vehicle in front of the tech. Install with the right tool, then verify tracking before the car leaves the bay. That sequence keeps labor efficient and protects the shop's reputation.
Where to Find the Correct Serpentine Belt Diagram
A belt job slows down fast when the sticker is gone, the old belt is already off, and the car is tying up a bay. Good shops prevent that problem by using the same search order every time.
Start with the vehicle, then verify against the car in front of you
The fastest reference is usually the factory decal under the hood. Check the radiator shroud, fan shroud, or strut tower area first.
Under-hood decals are fast, but they are not always readable. Heat, oil contamination, and previous body or cooling system work often leave them torn, painted over, or missing.
Even with a clear sticker, verify that the pulley layout on the engine matches the diagram. That extra check saves comebacks on vehicles with engine swaps, accessory changes, or trim-level differences that alter the routing.
Use a shop-first search order
This sequence keeps the job moving without turning diagram lookup into unpaid time:
- Check the under-hood decal. If it is present and legible, it is usually the quickest answer.
- Match the actual pulley arrangement. Count the idlers, identify the tensioner position, and confirm the accessory set before trusting the sticker.
- Pull up OEM or professional service information. Use the exact engine code and accessory package, not just year, make, and model.
- Use the belt manufacturer database as a backup. This is often faster than digging through generic web results.
- Capture the existing routing before removal. A phone photo or quick sketch can save a stalled job if the reference turns out to be wrong or incomplete.
That order matters in a working shop because speed alone is not enough. The quickest source is only useful if it matches the vehicle in the bay.
Use manufacturer support if the in-bay reference is gone
Dayco keeps a large library of routing references in its belt routing diagram database. That makes it a practical backup for shops dealing with missing decals, illegible labels, or vehicles that arrived with the belt already removed.
Some aftermarket databases are better than others. The useful ones let a tech confirm more than just the path. They also help verify whether the vehicle uses a different idler arrangement, tensioner location, or accessory drive package than expected.
A missing sticker is a lookup problem. Treating it like a memory test wastes labor and increases the chance of a routing mistake.
What wastes time
Guessing from pulley position alone is how simple belt jobs turn into repeat work. Similar engines can use different routing with only one pulley moved, and that one change is enough to cause noise, poor belt wrap, or immediate tracking issues.
If the old belt is still on the engine, preserve that information before touching anything. If it is already off, verify the diagram first, then install. That habit protects both the repair and the gross profit on a job that should have been straightforward.
How to Read Any Serpentine Belt Routing Diagram
A belt diagram only helps if the tech reads the contact surfaces correctly. In the bay, that is the difference between a clean install and a comeback for squeal, belt walk, or an accessory that turns the wrong way.
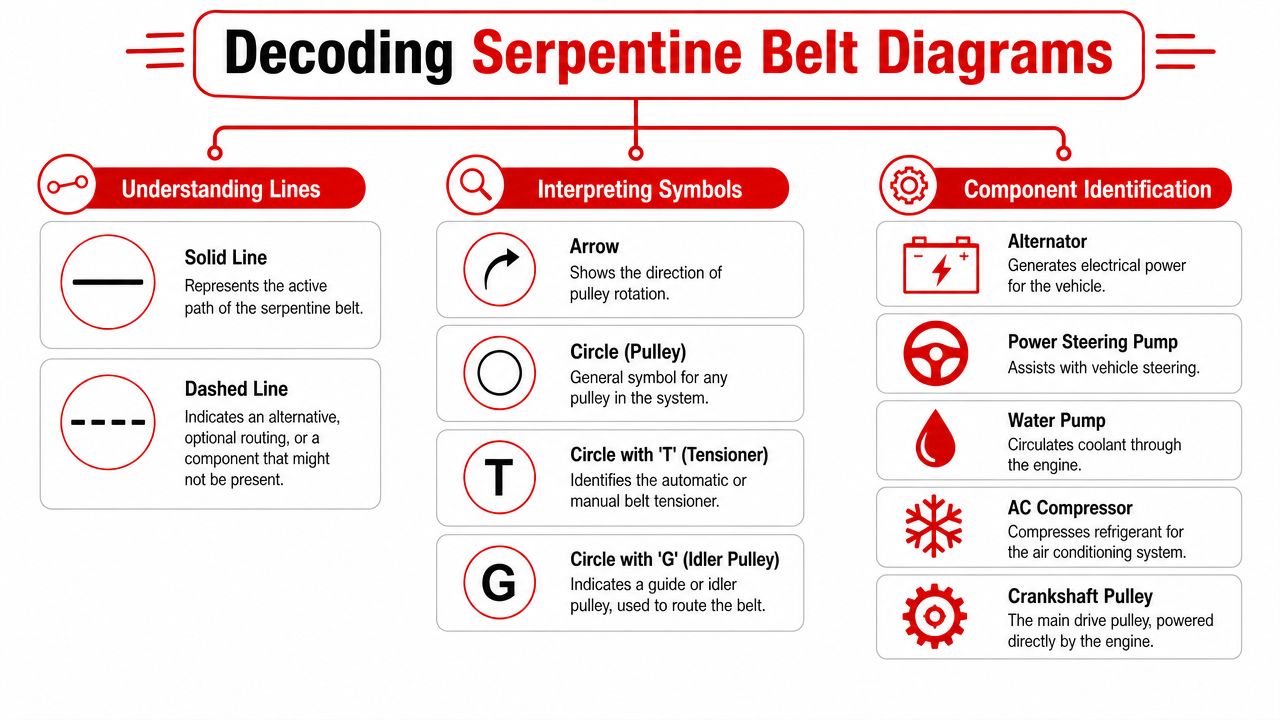
A routing diagram shows two things at once. It shows the path, and it shows which side of the belt rides on each pulley.
Read the line style before tracing the route
Most diagrams use line style to show belt orientation. The ribbed side must run on grooved pulleys. The back of the belt runs on smooth pulleys. If those surfaces do not match, the route is wrong, even if the belt seems to fit around every accessory.
Relying on what looks right is where belt jobs go sideways. On a crowded front dress, a wrong wrap can still let the tensioner load the belt, which tricks a rushed tech into thinking the installation is finished.
When the diagram gets cramped, stop following the whole loop for a moment. Read one pulley at a time and confirm the belt side touching it. That method is faster than removing and rerouting the belt after startup.
Identify pulley type before worrying about sequence
Separate the system by pulley function first. Once each pulley is classified, the route becomes easier to verify.
| Pulley type | Surface on pulley | Belt side that contacts it | Typical role |
|---|---|---|---|
| Grooved accessory pulley | Grooved | Ribbed side | Drives an accessory |
| Smooth idler pulley | Smooth | Flat back | Changes belt direction |
| Tensioner pulley | Smooth or grooved depending on design | Must match pulley face | Maintains belt tension |
| Crankshaft pulley | Grooved | Ribbed side | Main drive source |
Start at the crank pulley. It is the drive point and usually the easiest reference on both the engine and the diagram. From there, follow the belt in one direction and verify each contact point instead of trying to hold the full pattern in your head.
That matters in a working shop. A repeatable reading method cuts install time, lowers mistakes, and keeps a basic belt job from tying up a bay longer than it should.
Look for the common traps
Close pulley spacing causes most reading errors. The belt may pass near another segment without crossing it, and a small diagram can make that look like an overlap. Follow the line segment from pulley to pulley, not by general direction.
Tensioners also get miscalled. A smooth pulley near the top front of the engine could be an idler or the tensioner pulley. The diagram helps, but the hardware confirms it. Look for the spring-loaded arm and pivot point before assuming its role.
Missing wrap is another giveaway. If the belt path leaves too little contact on the crank or a driven accessory, the routing is probably off by one pulley. That mistake often shows up as noise under load or weak accessory performance right after startup.
Shop cue: If the belt leaves a grooved pulley and reaches the next grooved pulley on its flat side, the routing is wrong.
The fastest techs do not read belt diagrams by shape alone. They read them by surface contact, pulley function, and belt wrap. That approach holds up even when the underhood sticker is poor, the replacement diagram is small, or the vehicle came in with the old belt already off.
Common Serpentine Belt Routing Configurations
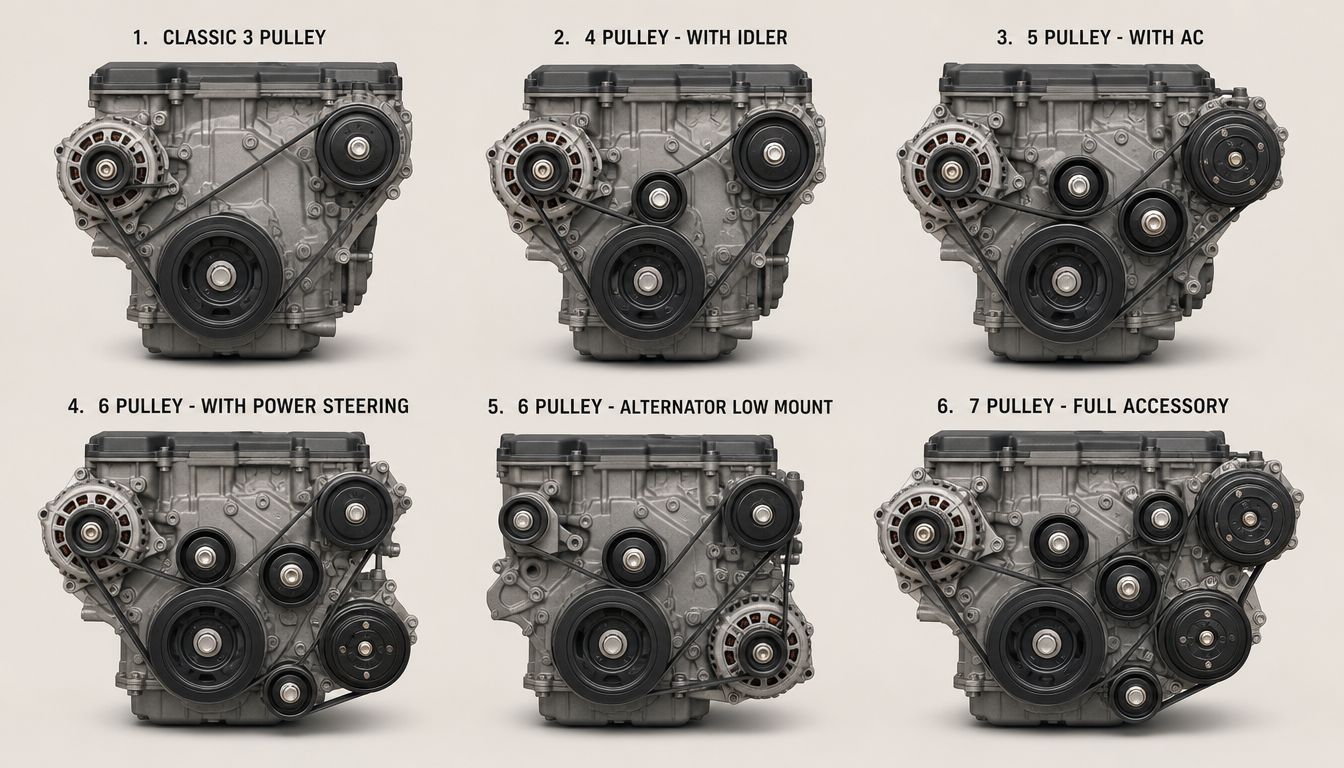
Specific diagrams matter, but pattern recognition saves time. Most engine bays fall into a handful of familiar layouts. A tech who recognizes the pattern can spot mistakes faster, even before checking final tension or startup behavior.
This visual helps frame the common layouts seen in the bay.
The simple four-pulley layout
This is the easiest one to service. The crank drives a small group that often includes the alternator, water pump, and a tensioner or idler. There isn't much extra routing, so the main failure point is usually misreading belt side contact rather than losing the route entirely.
A setup like this rewards basic checks. Confirm wrap at the crank, make sure the tensioner travel looks normal, and verify the belt sits fully in the grooves before releasing tool pressure.
The common accessory-heavy layout
This is the layout most general repair shops see every day. It usually includes the crank, alternator, A/C compressor, power steering pump on hydraulic systems, one or more idlers, and a tensioner. The route often snakes across the front of the engine with one or two long unsupported spans.
The trade-off is packaging versus serviceability. The manufacturer uses idlers and tensioner position to gain belt wrap on accessories, but the added pulley count gives the tech more opportunities to miss one.
The compact transverse layout
On many transverse engines, the belt path is compressed into a tight side view through the wheel well or lower splash access. The route itself may not be complicated, but visibility is poor and pulley depth is harder to judge.
A diagram matters most because visual intuition is weak. A pulley can look like it wants the ribbed side until the light hits it correctly and shows a smooth face. On these jobs, rotating the crank by hand after installation often reveals a seating issue before startup.
If the engine bay is tight enough that the full route can't be seen from one angle, slow down. Tight packaging hides simple mistakes.
The specialty layout with extra driven components
Some systems add another accessory such as a second alternator, a dedicated idler arrangement, or another driven component that changes belt path significantly. The route may still follow the same basic rule set, but the visual pattern is less familiar and the tensioner can sit in an unusual position.
These are the jobs where guessing from a “close enough” diagram causes problems. A similar engine family may use a different path because of one extra bracket or accessory mount.
What pattern recognition does well and where it fails
Pattern recognition is good for:
- Spotting a missed pulley: The belt path looks too direct or too loose.
- Checking wrap: An accessory that should have strong belt contact has too little arc.
- Noticing impossible geometry: The belt appears twisted or the back side lands on a grooved pulley.
Pattern recognition fails when:
- The engine has multiple accessory variants
- The vehicle has been modified
- The old belt is gone and the decal is unreadable
That's the right point to stop relying on memory and go back to the exact serpentine belt routing diagram for that vehicle.
Identifying Tensioners and Idler Pulleys Correctly
A lot of belt jobs come back because the belt wasn't the actual problem. The tensioner was weak, the idler bearing was rough, or one pulley had enough wobble to push the new belt off track. The diagram tells the path. It doesn't guarantee the hardware is worth routing around.
Know what the tensioner is doing
An automatic spring-loaded tensioner applies belt tension through its arm and pulley. A manual system requires adjustment. Some designs package the tensioner low and out of sight, while others put it front and center with a clear tool pad or hex boss.
The quick identification method is physical, not theoretical. Look for the pulley attached to a movable arm and pivot. If the pulley sits on a fixed bracket with no travel, that's usually an idler.
Separate the idler from the tensioner on sight
A stationary idler only guides the belt. It changes the route, increases wrap, or creates clearance around other components. It doesn't apply tension.
That difference matters during diagnosis. A failed idler often growls or wobbles. A weak tensioner can let the belt flutter, chirp, or lose control under load changes.

Record what the engine looked like before teardown
A strong shop habit is to capture a before photo of the belt path, tensioner position, and any visible wear marks before removal. That helps in two ways. It gives the technician a backup reference if the old belt is still present, and it creates documentation if there's a later dispute about pre-existing component wear.
Use the same habit for tensioner witness marks or alignment indicators. If the belt system looked marginal before teardown, a photo keeps the story clear for both the front counter and the customer.
The belt is only one part of the repair. The pulleys decide whether that repair lasts.
Shop Notes for Serpentine Belt Replacement
A clean replacement starts before the old belt comes off. The new part only goes on once the tech knows the route, checks every pulley, and confirms the belt length and rib count match the application. Rushed installs create the kind of simple failures that waste the most time.
The checklist that saves comebacks
- Use the correct tensioner tool: A long-handled serpentine belt tool gives control in tight spaces and reduces the chance of slipping off the tensioner.
- Spin every pulley with the belt removed: Roughness, noise, drag, and wobble don't improve with a new belt.
- Check alignment with a straightedge: One bracket out of plane can chew up a belt edge fast.
- Seat the belt fully in every groove: A belt riding one rib off can survive just long enough to make the job look finished.
- Leave the easiest pulley for last: Usually a smooth idler or accessible top pulley makes final installation cleaner.
Service interval and customer communication
Serpentine belts are engineered to last between 60,000 and 100,000 miles, and incorrect routing can cause immediate failure within minutes of engine startup, often with secondary damage to tensioners or pulleys, according to CarParts' serpentine belt routing and replacement guide.
That gives service advisors a straightforward way to explain the repair. Belt replacement isn't just about noise. It's preventive work tied directly to accessory drive reliability. It also opens the door to inspect related components before they create a larger problem.
If the customer is already facing charging issues, it helps to frame the belt system as part of the full diagnosis. A practical reference like this guide to can help explain why a failed charging complaint shouldn't automatically be blamed on the alternator alone when belt slip, weak tension, or pulley trouble may be involved.
What works when the diagram is missing
If the old belt is still installed and there's no diagram, preserve the route before teardown. A phone photo is best because it captures pulley face and belt position. A hand sketch still works if access is poor or the view is blocked.
If the belt is already gone, don't start trial-fitting. Match the vehicle, engine, and accessories to a verified diagram first. Trial-and-error routing often seems faster until the belt is installed twice and the tensioner gets overextended.
One hard rule: Never use startup as the first routing check. Confirm seating and path by hand before the key is turned.
Troubleshooting Common Belt Routing Issues
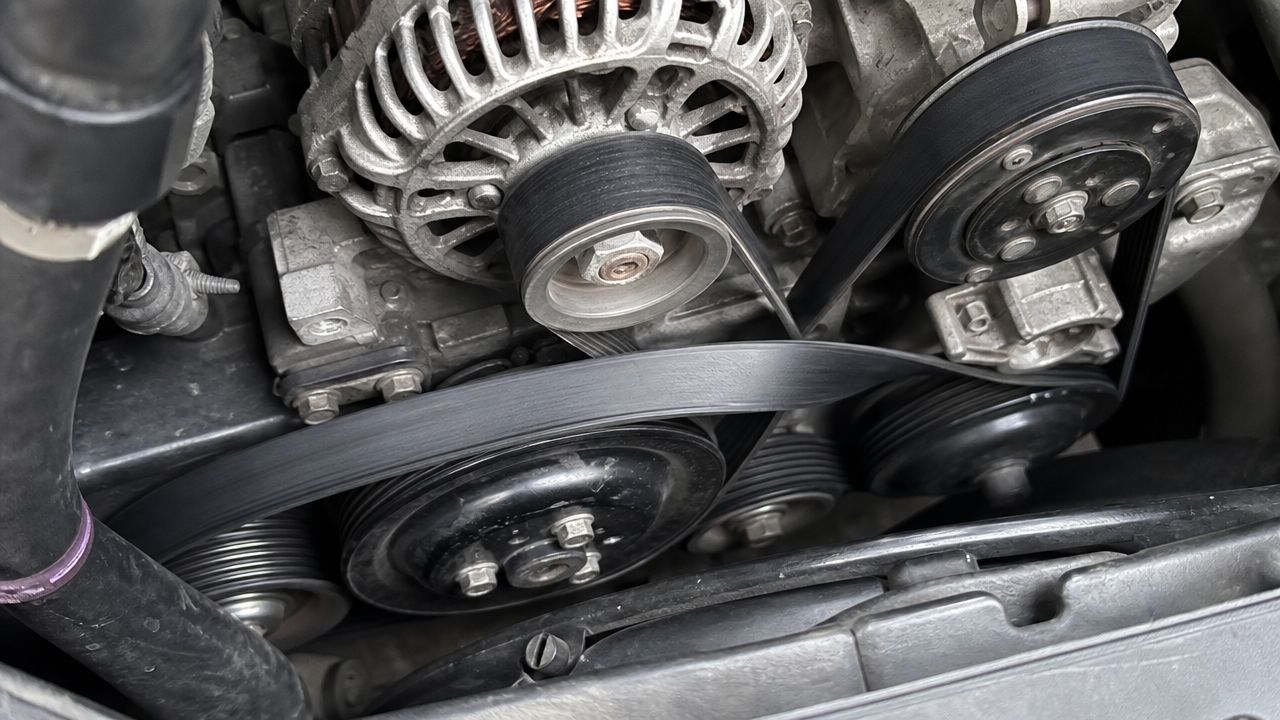
Most post-repair belt problems point back to one of three areas. Routing, alignment, or tension control. The sound or failure pattern usually narrows it down quickly if the tech reads it correctly.
Symptom and likely cause
| Symptom | Most likely cause | What to check first |
|---|---|---|
| Persistent squeal | Weak tensioner, poor belt seating, or misalignment | Tensioner travel and groove seating |
| Belt shreds on one edge | Pulley misalignment or wobble | Bracket alignment and bearing play |
| Belt walks off pulley | Incorrect routing or failed pulley bearing | Exact route and pulley tracking |
| Accessory underperforms | Belt not driving the pulley correctly | Pulley contact side and wrap |
Read the belt before replacing the belt again
A shiny glazed section can point to slip. Frayed edge cords usually indicate tracking trouble. If one accessory pulley shows abnormal dust or heat marks, that accessory may be the drag point that the new belt exposed.
The mistake is replacing the belt twice without correcting the cause. A fresh belt can hide a weak tensioner briefly, but it won't fix it.
Fast comeback triage
Use a short process:
- Reconfirm the route against the verified diagram
- Inspect pulley faces for damage or contamination
- Watch tensioner movement with the engine running
- Check for lateral belt movement at idle
- Shut down and hand-rotate if anything looks unstable
A belt system that's routed correctly and running on healthy pulleys tracks cleanly. If it doesn't, the issue is usually visible once the tech stops assuming the new belt is automatically innocent.
Serpentine Belt Diagram and Replacement FAQ
Can a slightly shorter or longer belt be used in a pinch
Use the specified belt length. A belt that is even a little off can push the tensioner out of its working range, reduce pulley wrap, and create tracking problems that look like a bad pulley or weak tensioner. Saving a few minutes at the parts counter can cost the shop a comeback.
Are serpentine belts directional
Most serpentine belts are not directional. If the belt is being reused for diagnosis, mark the rotation direction before removal so it goes back on the same way. That avoids introducing a new variable while you are trying to confirm a noise or tracking issue.
What's the best move if an accessory is seized
Do not force the belt around a locked accessory. Identify the failed component first, then check whether the vehicle has a verified bypass route or if the repair requires replacing that accessory before the belt goes back on. Guessing at an alternate path usually turns one failure into two.
Should the tensioner be replaced with the belt
Replace it based on condition, not habit. If the tensioner arm is weak, noisy, crooked, rough through travel, or sitting near its limit with the correct belt installed, the belt alone will not finish the job. In a flat-rate shop, that inspection matters because the cheapest estimate is not the most profitable one if the car returns with the same complaint.
What helps most with speed and accuracy
A fixed process beats memory. Pull the correct diagram, compare pulley count and accessory layout, route the belt with the grooved and smooth sides in the right places, then confirm tensioner position and belt tracking before release. Shops that standardize that routine waste less labor time and write better estimates because the root problem is identified before parts are sold.
Shops that want cleaner workflow around inspections, estimates, photos, invoices, and customer communication can explore RedAppy features or reach out through the RedAppy contact page. When the process around the repair is as organized as the repair itself, the whole shop moves better.
Ready to Transform Your Shop?
RedAppy helps auto repair shops create professional digital estimates with photos and videos, send them instantly via text or email, and get customer approvals in seconds. No credit card required to start.