
Shop Invoices: What They Are, What to Include, and How to Create One
A shop invoice is more than just a bill — it's a legal record of every repair, part, and labor charge your customer agreed to pay. Get it right, and you protect your business, build trust, and get paid faster. Get it wrong, and you risk disputes, chargebacks, and unhappy customers who never come back.
For auto repair shops, invoicing isn't optional paperwork. It's the final step in every job, and it directly affects cash flow, customer satisfaction, and your shop's reputation. According to a, 29% of small business owners say late or disputed payments are one of their biggest financial challenges — and vague invoices are a leading cause.
This guide covers everything you need to know: what a shop invoice includes, how it differs from an estimate, common mistakes to avoid, and how modern shop management software like RedAppy makes the whole process faster and nearly error-free.
Table of Contents
- What Is a Shop Invoice?
- What Every Shop Invoice Should Include
- How to Create a Shop Invoice (Step-by-Step)
- Conclusion
- Frequently Asked Questions
What Is a Shop Invoice?
A shop invoice is a final, itemized bill presented to a customer after auto repair work is completed. It documents every service performed, every part used, the cost of each, and the total amount owed.
It's easy to confuse a shop invoice with two other common documents — but they serve different purposes:
- An estimate comes before the work. It gives the customer a projected cost.
- A repair order (RO) is the working document used during the job. It tracks what was authorized and what's being done.
- A shop invoice is the end result. It's issued when the work is done and payment is due.
- A receipt is proof that payment was already made — it comes after the invoice is settled.
A shop invoice is not just a billing tool — it's a legal record of the transaction between your shop and the customer.
Where It Fits in the Repair Order Workflow
In a typical auto repair shop, the invoicing process follows a clear sequence. A customer brings in a vehicle, the shop creates a repair order, work gets authorized and performed, and then the repair order converts into a final invoice.
That final invoice is what the customer signs or receives when they pick up their vehicle. In practice, shops that use shop management software close this loop automatically — the completed RO becomes the invoice with minimal manual steps.
Why It Matters Legally and Financially
A shop invoice is a binding financial document. It protects both the shop and the customer by creating a written record of what was agreed upon and what was charged.
From a business standpoint, invoices are essential for accurate bookkeeping, tax filing, and tracking revenue. According to the, businesses must keep records that support income and deduction claims — and invoices are the primary supporting document for service businesses.
From a legal standpoint, many states require auto repair shops to provide written invoices that meet specific disclosure standards. Failing to produce proper invoices can expose a shop to consumer protection complaints or licensing issues.
A well-structured shop invoice also reduces disputes. When a customer questions a charge, a clear, itemized invoice is the fastest way to explain and defend what was done.
What Every Shop Invoice Should Include
A professional shop invoice should contain specific information to be legally valid, useful to the customer, and defensible if a dispute arises. Missing even one key field — like a VIN or authorization signature — can create problems during audits, warranty claims, or chargebacks.
Here are the core fields every shop invoice needs:
- Shop information: Business name, address, phone number, and license number (required in many states)
- Customer information: Full name, address, phone number, and email
- Vehicle details: Year, make, model, VIN, license plate, and mileage in/out
- Repair order number: A unique identifier that ties the invoice to the original work order
- Date of service: When work was performed and when the invoice was issued
- Labor line items: Each job listed separately with description, labor hours, and rate
- Parts line items: Each part listed with part number, description, quantity, and unit price
- Subtotals, taxes, and fees: Clearly separated before the final total
- Payment terms: Due date, accepted payment methods, and any deposit applied
- Warranty statement: What's covered, for how long, and any exclusions
- Customer authorization: Signature or documented approval before work began
The table below separates what's required from what's optional but recommended:
| Field | Required | Optional but Recommended |
|---|---|---|
| Shop name and contact info | ✅ | |
| Customer name and contact | ✅ | |
| VIN | ✅ | |
| Mileage in/out | ✅ | |
| Labor description and hours | ✅ | |
| Parts with part numbers | ✅ | |
| Taxes and shop fees | ✅ | |
| Customer authorization signature | ✅ | |
| Technician name or ID | ✅ | |
| Photo documentation reference | ✅ | |
| Warranty terms | ✅ (strongly advised) | |
| Next service recommendations | ✅ | |
| QR code for online payment | ✅ |
Including mileage in and out is one of the simplest ways to protect your shop from liability claims about vehicle damage.
Labor and Parts Breakdown
Labor and parts should always appear as separate line items — never lumped into a single charge. This level of detail is what separates a professional invoice from a handwritten receipt, and it matters for several practical reasons.
When customers can see exactly what they're paying for, disputes drop. A customer who questions a $400 bill is far more likely to accept it when they can see: 2.5 hours at $120/hr for a timing belt replacement, plus a $95 part with the part number listed. Transparency does the explaining for you.
For labor, each line item should include:
- A plain-language description of the job (e.g., "Replace front brake pads and rotors — both sides")
- The flat-rate or actual hours charged
- The labor rate applied
- The calculated labor total for that job
For parts, each line item should include:
- The part name and description
- The OEM or aftermarket part number
- Quantity ordered
- Unit price and extended total
Part numbers matter more than most shops realize. They create a verifiable paper trail if a part fails under warranty, if a supplier needs to process a return, or if a customer later questions whether the correct component was installed.
Shops that itemize labor and parts separately report fewer customer disputes and faster payment approvals — customers feel informed, not surprised.
According to the, customers have the right to a written estimate and a final invoice that clearly shows all charges. Itemization isn't just good practice — in many states, it's the law.
In practice, the cleanest invoices use consistent formatting for every job. That means the same structure whether the repair order has one line item or fifteen. When shop management software handles this automatically, technicians and service writers don't have to think about it — the format is built into the workflow.
Authorization, Signatures, and Legal Disclaimers
Customer authorization is the single most important legal protection on a shop invoice. Without documented approval — either a physical signature or a digital one — a shop has limited recourse if a customer refuses to pay or claims they never agreed to the work.
Authorization should happen at two points: before work begins (on the repair order) and ideally acknowledged again on the final invoice. Most disputes come down to "I didn't know it would cost that much." A signed estimate or work authorization eliminates that argument.
Key disclaimers to include on every shop invoice:
- Warranty disclaimer: What's covered, the duration (e.g., 12 months/12,000 miles), and any conditions that void it
- Found damage clause: A statement that the shop is not responsible for pre-existing conditions discovered during the repair
- Storage fee notice: If unclaimed vehicles are charged a daily rate after a certain period
- Parts ownership: Whether replaced parts are returned to the customer or discarded
- Payment terms: Including any late fees or returned check policies
California sets one of the most detailed legal standards for shop invoices in the country. The requires shops to provide written estimates before work, obtain authorization, and include a complete parts and labor breakdown on the final invoice. Shops operating without these elements risk fines and license suspension.
Even if your state has fewer formal requirements, following California's standards is a solid baseline. Most shop management platforms build these fields into their invoice templates by default, so compliance happens automatically rather than relying on individual staff to remember every required element.
Digital authorization — where customers approve work via a text link or email — creates a timestamped record that's actually stronger evidence than a paper signature in a dispute.
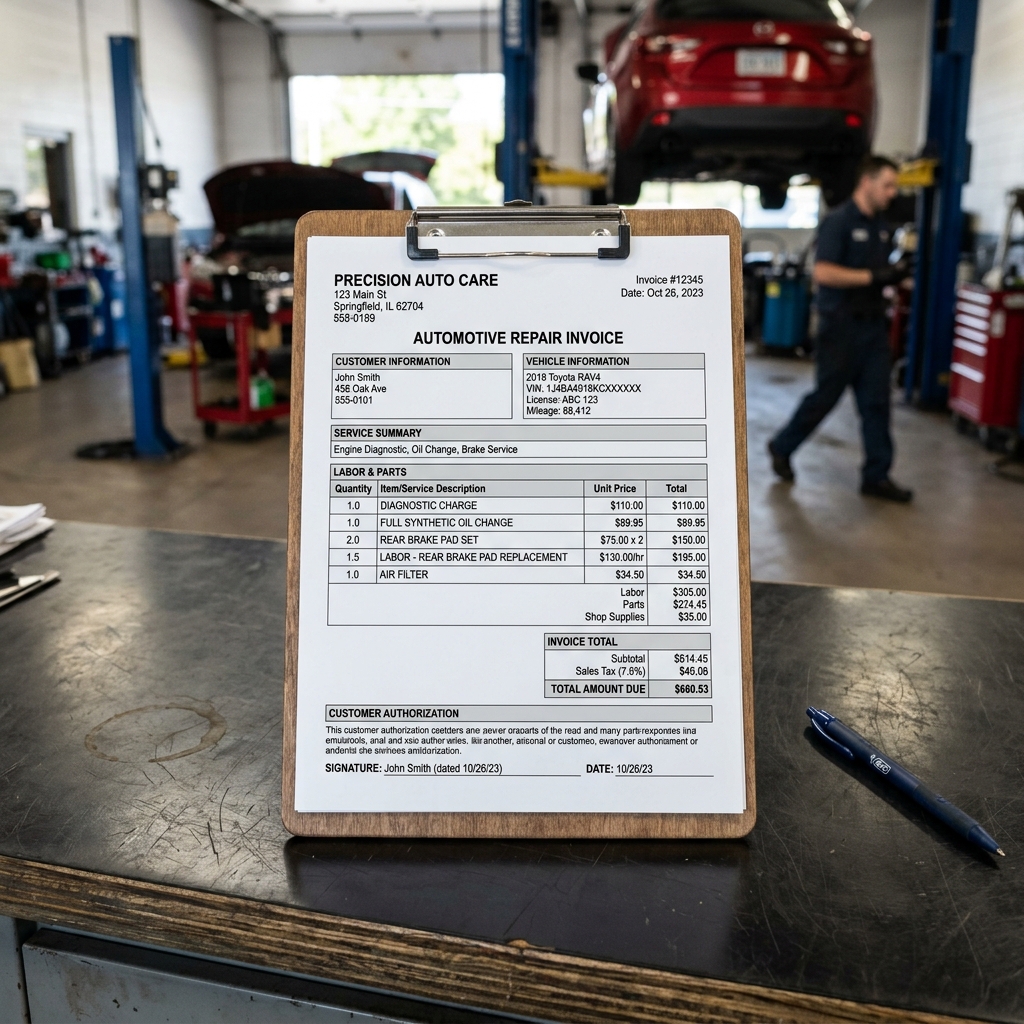
Labor and Parts Breakdown
Itemizing labor and parts separately is one of the most important things a shop invoice can do. It shows the customer exactly what they're paying for — and gives your shop a clear record if questions come up later.
Why Separate Line Items Matter
Lumping labor and parts into a single total is a red flag for customers. It looks like something is being hidden. Shops that break out every line item build trust and see fewer payment disputes.
Transparent invoicing reduces "why is this so expensive?" conversations — customers who can see each charge rarely push back on the total.
From experience, shops that provide detailed breakdowns also find it easier to justify premium labor rates. When a customer sees 2.5 hours at $120/hr for a timing belt replacement, the number makes sense.
How to Itemize Labor
Each labor line should include:
- Job description — Be specific. "Replace timing belt and tensioner" is better than "engine work."
- Labor hours — List the flat rate or actual time used (e.g., 2.5 hrs)
- Labor rate — Your shop's hourly rate (e.g., $120/hr)
- Line total — Hours × rate (e.g., $300.00)
If a job has multiple operations — like a brake job that includes pad replacement, rotor resurfacing, and a brake fluid flush — each should appear as its own labor line.
How to Itemize Parts
Each parts line should include:
- Part name and description — Be clear (e.g., "OEM timing belt — Honda 14400-R70-A01")
- Part number — Helps with warranty claims and reorders
- Quantity — Especially important for consumables like filters or hardware
- Unit price
- Line total
Some shops also note whether a part is OEM, aftermarket, or customer-supplied. This protects you if a customer-supplied part fails and they try to hold the shop responsible.
Labor vs. Parts: What Customers Are Actually Paying For
| Line Type | What It Covers | Example |
|---|---|---|
| Labor | Technician time and expertise | 2.5 hrs × $120 = $300 |
| Parts | Physical components installed | Timing belt kit — $85.00 |
| Shop supplies | Fluids, rags, small hardware | $12.50 flat fee |
| Sublet | Work sent to a specialist | Alignment — $65.00 |
| Taxes | State/local sales tax on parts | 8% × $85 = $6.80 |
Shop supplies and sublet charges are often overlooked but should always be listed. Leaving them out and rolling them into labor creates confusion.
Keeping Labor Times Accurate
Flat-rate labor guides give shops a standard time for common repairs. Using published labor times — rather than estimating — keeps your invoices consistent and defensible. If a job takes longer than the flat rate, note it and explain why. Customers appreciate the honesty more than a surprise charge.
According to the, labor charges must be based on a clear, written description of work performed. Vague line items can create compliance problems in regulated states.
A single unclear line item — "misc. labor, $250" — can undo all the trust a shop built during the repair.
The goal is simple: any customer should be able to read your invoice and understand exactly what was done and why each charge exists. That clarity protects both sides of the transaction.
Authorization, Signatures, and Legal Disclaimers
Customer authorization is the legal record that a customer agreed to the work before it was performed. Without it, a shop has little protection if a customer disputes a charge or refuses to pay.
Most states require shops to get written authorization before starting repairs. California's Bureau of Automotive Repair (BAR), for example, mandates that shops provide a written estimate and obtain customer authorization — either in person, by phone, or electronically — before any work begins. Shops that skip this step can face fines, license suspension, or forced refunds.
What Authorization Should Include
A proper authorization record covers:
- The customer's name, date, and contact information
- A description of the work authorized
- The estimated cost or cost cap
- The customer's signature (or documented verbal/electronic approval)
- The date and time authorization was given
If a customer authorizes work by phone, document the call — log the time, who you spoke with, and what they approved. Many shops now use digital authorization through SMS or email, which creates a timestamped record automatically.
Undocumented authorization is no authorization at all. If a dispute goes to small claims court, a signed work order is often the deciding piece of evidence.
Signatures on the Final Invoice
The final invoice should also include a customer signature at pickup. This confirms the customer received the vehicle, reviewed the work, and acknowledges the total amount due. It's a separate step from the pre-repair authorization — both matter.
Some states require this signature by law. Even where it isn't mandatory, it protects the shop if a customer later claims they didn't know what they were being charged.
Legal Disclaimers That Protect Your Shop
Standard disclaimers on a shop invoice serve a real legal function. Common ones include:
- Warranty disclaimer: States the terms and duration of any parts or labor warranty, and what voids it
- Found damage disclaimer: Notes that the shop isn't responsible for pre-existing damage discovered during the repair
- Test drive disclaimer: Covers liability if a vehicle must be driven for diagnostic purposes
- Unclaimed vehicle policy: Specifies storage fees and the timeframe after which an unclaimed vehicle may be subject to a lien
- Parts disclaimer: Notes whether new, remanufactured, or used parts were installed, and their respective warranty coverage
These aren't just fine print. In practice, a clear warranty disclaimer prevents a customer from returning six months later expecting free repairs on unrelated work.
State-by-State Requirements
Requirements vary significantly by state. California's BAR rules are among the most detailed in the country — they specify and mandate that customers receive a copy of the signed repair order. Other states follow similar frameworks but with different thresholds and documentation rules.
It's worth checking your state's motor vehicle repair act or consulting with a local trade association to confirm what's legally required in your jurisdiction. The publishes resources that help shops stay current on compliance requirements.
| Disclaimer Type | Why It Matters |
|---|---|
| Warranty terms | Defines scope and limits of coverage |
| Pre-existing damage | Protects shop from unrelated liability claims |
| Unclaimed vehicle policy | Enables legal enforcement of storage/lien rights |
| Parts type disclosure | Required in many states; affects warranty validity |
| Test drive/road test | Limits liability during diagnostic driving |
Getting authorization and disclaimers right isn't just about legal compliance — it builds the kind of transparency that turns first-time customers into repeat customers. When people see that a shop operates professionally and clearly, they trust it more.

How to Create a Shop Invoice (Step-by-Step)
Creating a shop invoice follows a clear sequence — from opening the repair order at check-in to collecting payment at the end. Whether you're working with paper or software, the core steps are the same. The difference is how long each step takes and how many errors slip through.
Step 1: Open a Repair Order at Check-In
When a vehicle arrives, start a repair order (RO) immediately. Capture the customer's name, phone number, and address. Record the vehicle's year, make, model, VIN, license plate, and current mileage. This information anchors every document that follows — estimate, authorization, and final invoice.
Step 2: Document the Work Requested
List every job the customer is asking about. Be specific. "Check engine light" is not enough — note the symptoms, any codes retrieved, and what the customer has already tried. This detail protects you later if there's a dispute about what was and wasn't authorized.
Step 3: Get Written Authorization Before You Start
Before a technician touches the vehicle, present a written estimate and get a signature — in person or electronically. In many states, this is a legal requirement, not just good practice. California's Bureau of Automotive Repair, for example, for any work over a set dollar threshold.
Step 4: Record All Labor and Parts During the Job
As work progresses, log every labor operation with the time spent and your shop's hourly rate. Add every part used with its part number, supplier, quantity, and cost. Don't wait until the job is done to fill this in — real-time tracking prevents missing items that never make it onto the final bill.
Shops that document labor and parts as the job progresses are far less likely to under-bill or face disputes at pickup.
Step 5: Apply Taxes, Fees, and Discounts
Once all line items are logged, apply applicable taxes. Most states tax parts; some tax labor as well — rules vary by state, so verify your local requirements. Add any shop supply fees or environmental disposal charges. Apply any discounts or coupons before calculating the total.
Step 6: Review the Invoice Before Presenting It
Do a final check before handing the invoice to the customer. Confirm that every authorized job is listed, every part has a line item, the math is correct, and your warranty statement is present. A two-minute review catches the errors that lead to awkward conversations at the counter.
Step 7: Present the Invoice and Collect Payment
Walk the customer through the work performed, especially anything that was added after the original estimate. Get payment — cash, card, or digital — and provide a copy of the signed, paid invoice. This copy serves as their receipt and warranty record.
The Problem with Paper and Spreadsheets
Manual invoicing works at low volume, but the limitations compound quickly.
- Errors from retyping: Labor times, part numbers, and pricing entered by hand get transposed or miscalculated.
- No automatic tracking: Paper invoices don't connect to your parts inventory, customer history, or revenue reports.
- Time cost:, small businesses spend an average of 14 hours per week on administrative tasks — invoicing is a major contributor.
- Retrieval problems: Finding a six-month-old paper invoice for a warranty claim can take 20 minutes or more.
- Payment delays: Paper invoices have no built-in way to send a digital payment link or accept cards remotely.
In practice, a shop writing 10–15 repair orders per week can manage manually — but at 30+ ROs, the time and error costs become significant. That's the point where most shops start looking at shop management software to handle invoicing as part of the broader workflow.
Conclusion
A well-structured shop invoice does more than request payment — it protects your business, builds customer trust, and creates a record that pays dividends long after the job is done.
The shift from paper to digital invoicing isn't just about convenience. It directly affects how fast you get paid, how few disputes you face, and how much time your staff spends on admin work each week. Shops that move to digital invoicing consistently report fewer errors, faster payment cycles, and better customer communication.
Getting invoicing right is one of the highest-leverage improvements a shop can make — it touches revenue, reputation, and compliance all at once.
Here's what the evidence shows: manual invoicing methods scale poorly. A single-bay shop can manage with spreadsheets and handwritten forms, but as volume grows, the errors compound and the time cost becomes unsustainable. That's the inflection point where shop management software pays for itself.
The key takeaways from this guide:
- A shop invoice is a legal document, not just a bill — it needs customer authorization, a clear parts and labor breakdown, disclaimers, and proper business identification
- Every line item matters: separate labor rates, part numbers, taxes, and fees reduce disputes and protect the shop
- State regulations (like California's BAR requirements) set minimum standards — know the rules in your jurisdiction
- Digital platforms automate the path from repair order to final invoice, eliminating manual data entry and reducing the chance of mistakes
- Searchable digital records make warranty lookups, tax preparation, and repeat customer service dramatically faster
If your shop is still creating invoices manually, the practical next step is straightforward: audit one week of invoices against the required fields covered in this guide. Identify what's missing — whether that's VIN documentation, authorization signatures, or itemized labor times. That gap analysis tells you exactly what to fix, whether you stay manual or move to a platform.
For shops ready to automate, shop management software like RedAppy brings invoicing, digital inspections, parts ordering, and payment collection into a single workflow. Features like one-click invoicing and customer lookup by name, plate, or VIN eliminate the friction that slows shops down — and the reported result of saving 10+ admin hours per week reflects what that friction was costing in the first place.
A professional invoice is the last thing a customer sees before they leave your shop. Making it accurate, clear, and easy to pay is one of the simplest ways to end every job on a strong note.
Frequently Asked Questions
What is a shop invoice?
A document issued by a seller to a buyer detailing the products or services provided, quantities, prices, and total amount owed. It serves as both a payment request and an official record of the transaction for bookkeeping and tax purposes.
How to create a shop invoice?
Include your business name, contact details, a unique invoice number, itemized list of goods or services, pricing, taxes, payment terms, and due date. Tools like QuickBooks, FreshBooks, or free templates in Word and Google Docs can streamline the process significantly.
How do I get invoices?
Invoices can be requested directly from the seller or vendor after a purchase, or accessed through an accounting platform if your business uses one. Many e-commerce platforms like Shopify or Etsy automatically generate and email invoices upon order completion.
How to find receipts on Shop app?
Open the Shop app, tap your profile icon, and navigate to "Orders" to view your purchase history and associated receipts. Tapping any individual order will display its details, including a receipt you can screenshot or share directly from the app.
Ready to Transform Your Shop?
RedAppy helps auto repair shops create professional digital estimates with photos and videos, send them instantly via text or email, and get customer approvals in seconds. No credit card required to start.