
Auto Repair Shop Receipt Template and How to Fill It Out
A customer comes back three weeks after a brake job. The pedal feels soft, and the only document in the file is a card receipt with a total and a scribbled signature. The shop now has to prove what was replaced, who did it, what the odometer read and what the warranty covers, and none of that is written down anywhere.
That gap is why an auto repair shop receipt template deserves more thought than a downloadable blank form. The receipt isn't a payment acknowledgment bolted onto the end of the job. It's the finished repair order, the approval trail and the warranty terms on one page, and it's what the customer, the insurer, the tax auditor and the state regulator all read when something goes wrong.
Table of Contents
- Copy-Ready Receipt Fields for Your Shop
- How to Fill Out the Receipt in Seven Steps
- What Each State Requires on the Invoice
- Using the Receipt as an Authorization and Dispute Record
- Keeping Receipts Audit-Ready and Taking the Next Step
Copy-Ready Receipt Fields for Your Shop
A receipt that holds up has every field filled, in the same order, every time. Print this table as the backbone of the template and the layout stops being a design decision.
| Field | What to Enter | Why It Matters |
|---|---|---|
| Invoice number | Sequential number, never reused | Lets you trace every receipt and any voided invoice |
| Date and time | Completion date and time | Proves when the work was finished |
| Shop details | Shop name, address, phone, registration or license number | Required by several states |
| Customer | Full name, phone number, email | Needed for approvals, callbacks and warranty claims |
| Vehicle | Year, make, model, VIN, plate | Ties parts and warranty to the correct car |
| Odometer | Reading at arrival and at completion | Shows mileage for warranty limits and disputes |
| Technician | Name of the technician who did the work | Settles questions about who performed each task |
| Services | Each repair or diagnostic, described in plain words | Shows what was authorized and what was done |
| Parts | Part name, part number, quantity, price, new, used or rebuilt | Required disclosure in several states |
| Labor | Hours and hourly rate for each service | Lets the customer check the labor charge |
| Tax and fees | Sales tax and shop fees on separate lines | Explains how the total was calculated |
| Warranty | Coverage length in time and mileage | Defines what is covered after pickup |
| Payment | Method, amount paid, balance due | Shows whether the job is settled |
Invoice Number and Completion Time
The invoice number is the thread that ties the receipt to the repair order, the payment and the tax report. Never reuse a number, and never renumber after the fact. If a job is voided, the number stays in the sequence with the word void and the reason beside it. A gap in the sequence reads as a deleted invoice to an auditor, and to any customer who asks for a copy.
The completion time, not the check-in time, is the honest timestamp for the receipt. Check-in tells you when the car arrived. Completion tells you when the work was finished, which is the fact a delay complaint or a warranty start date turns on. Keep both on the repair order and print the completion time on the customer copy.
Vehicle, Mileage and Parts
Copy the VIN and plate from the car itself, not from the registration card sitting in the console. A transposed character breaks the parts lookup and the warranty registration months later. The last eight characters are enough for the shop's internal search, but never for the customer copy. Insurers and warranty administrators match the full 17.
Odometer needs two readings, arrival and completion. Warranty limits are written in miles, and one number cannot prove both ends of a job. A customer who drives 900 miles between drop-off and pickup has changed the warranty picture. The receipt should show it.
Parts lines carry the part number, quantity, unit price and a condition flag: new, used, rebuilt or reconditioned. Several states treat that flag as a required disclosure rather than a courtesy. I would still print it in states that do not require it, because a "rebuilt" caliper sold as new is a common comeback argument.
The field most shops skip: the technician's name. When a comeback lands on the counter, the first question is who did the work and what they noted. A receipt without a name sends that question to a group chat.
What the FTC Expects on the Page
The Federal Trade Commission's treats the receipt as a completed repair order rather than a payment confirmation. It should describe each repair, list the parts supplied with the cost of each part, show labor charges, and record the odometer reading both when the vehicle arrived and when the repair order was completed.
The same guidance covers the front end of the job. Ask for a written estimate that names the condition being repaired, the parts required and the anticipated labor charge, plus a clear statement that the shop will seek approval before going past a specified time or money limit. A receipt that cannot be matched to that estimate has no ceiling on it.
The Two-Minute Check
Before the keys change hands, read the receipt as if you have never seen the car. Does every field have an entry, and could a customer who never watched the job follow what they paid for? If a line says "misc" or "shop supplies" without a number beside it, rewrite the line.
Paperwork discipline outlives the repair. When the owner eventually sells the car, the service file supports the asking price, and the same principle of complete, signed documents appears in these, where every term a buyer might question is written down instead of agreed verbally.
How to Fill Out the Receipt in Seven Steps
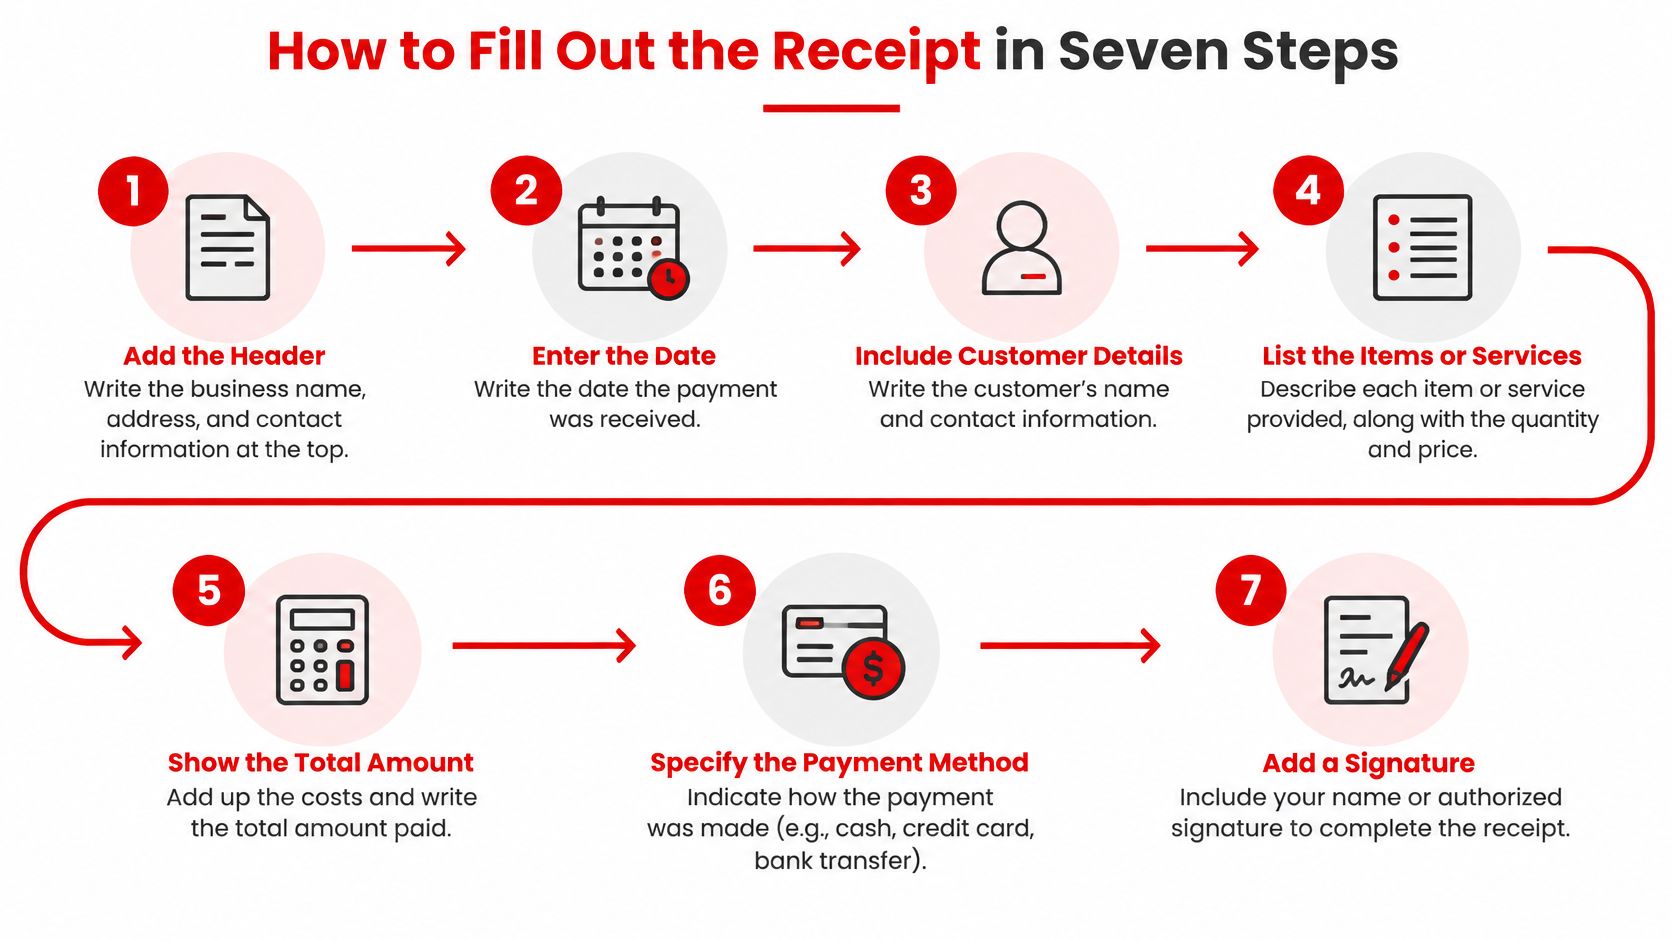
A customer questions a charge at pickup. The receipt should let both sides trace it to the work authorized, the work completed, and the amount paid. Fill it out in job order, while the details are still on the repair order.
Copy the customer and vehicle details from the repair order. Check the VIN against the vehicle, then confirm the customer's contact information and the odometer reading. A registration card may have an old address or plate number, so verify those details with the customer.
Record the approved work and its authorization. Keep the estimate and approval with the job record, including when and how the customer approved the work. The receipt should match the authorized operations or show the approval for any change.
Enter the completed work. List labor, parts, discounts, fees, and tax as applicable. If the job took longer than estimated, show the labor and explain the added work rather than hiding the difference in a parts charge.
Document every change to the estimate. Record what changed, who approved it, and how and when approval was given. A text reply, email approval, or signed revised estimate can make the record clear. A note written at checkout does not establish that the customer authorized the extra work beforehand.
Keep the authorization trail with the receipt. If a charge exceeds the approved estimate, document the customer's approval before proceeding, not after the work is complete.
Include warranty and no-charge work. Describe the work and show the amount charged as $0.00 when the shop did not charge for it. This leaves a record of what was done and helps distinguish warranty work from repairs the customer paid for.
Show the arithmetic in separate lines. List parts and labor separately, then show fees, subtotal, tax where applicable, total, amount paid, and remaining balance. Illinois requires separate listings and subtotals for service work and parts, with applicable tax and additional charges included in the total under its. Itemizing the charges also lets the customer check how the total was calculated.
Assign the next sequential receipt number and provide the customer copy. Keep a legible copy in the format and for the period required by the applicable state rules. If receipts are stored electronically, confirm the saved copy remains readable and can be retrieved.
What a Finished Receipt Looks Like
A one-page receipt can organize the details into four blocks. The header identifies the shop, customer, vehicle, receipt number, and completion date. The work section separates services and labor from parts, with descriptions, quantities, and prices. The totals section shows fees, subtotal, tax, total, amount paid, and balance. The footer records warranty terms, payment details, and any applicable signatures.
Check the printed or saved copy before handing it over. A missing charge description, unclear warranty term, or unexplained difference from the estimate can turn a straightforward pickup into a dispute.
What Each State Requires on the Invoice
Four states, four different pictures of a compliant invoice. The table lists only what each one requires beyond the customer name and the total.
| State | Required fields |
|---|---|
| Wisconsin | Repairs, replaced parts, part costs, labor, odometer reading, return date |
| Illinois | Itemized parts and labor, odometer reading, warranties, total price |
| Florida | Current date, repair description, used or rebuilt parts disclosure, warranty time and mileage, registration number |
| California | Separate diagnosis and warranty work, each part and price, itemized toxic-waste charges |
The frames those fields as a customer's right to know what was replaced and what it cost. Florida's go further and force a used, rebuilt or reconditioned disclosure on the part itself, plus a guarantee stated in both time and mileage. California's requires repairs described separately, including diagnosis and warranty work, with each part and its price visible.
Building One Master Template
Build a single master template carrying every field from the strictest state and mark the state-specific ones, so they appear or hide by location rather than by memory. A Florida job needs a used-parts disclosure even when the customer drives in from Illinois, and a California job needs a toxic-waste line even when the shop thinks of it as an internal cost.
Then confirm the rules for every state where the shop works before the template is printed or loaded into software. A professional-looking receipt that omits a required registration number or a rebuilt-part flag is still non-compliant.
Using the Receipt as an Authorization and Dispute Record
A customer questions a charge after the car is picked up. The receipt should let the shop trace what was approved, what work was completed, and what was charged. Wisconsin's groups repair complaints around unauthorized work, charges above estimates, unfinished work, unmet agreements, delays, and workmanship concerns. Those are the points a completed repair order needs to document.
Match each dispute to a record. For unauthorized service, keep the approval timestamp and how the customer approved the work. To address charges above the estimate, show the estimate beside the final charge for each line. For work the customer says was not done, list completed operations and identify the technician. Put warranty terms in writing, including time and mileage. Record completion time, and document any rework with its date and the person who performed it.
If a customer raises a claim, compare the approval, estimate, technician's job record, and receipt before responding. A clear match between those records helps resolve disagreements about authorization and charges. Answering from memory can lead to conceding a charge the shop did not make.
The Federal Trade Commission's describes documents a consumer in a dispute may be asked to provide, including sales or purchase agreements, vehicle registration, work orders, and proof of payment. Keep the shop's matching records together so they can be located when a dispute arises.
Keep the approval trail, not just the invoice. The invoice shows what was charged. The approval shows what the customer authorized.
Authorization and warranty terms should be clear before the work begins. For related, review how agreements, authorizations, and warranty language are handled.
Keeping Receipts Audit-Ready and Taking the Next Step
A receipt should be stored as a complete digital record, not as a single PDF that someone renders once and files. The Internal Revenue Service treats invoices, receipts, sales slips and card charge slips as supporting documents, and its guidance on expects those records to substantiate gross receipts and expenses with the amount received and its source.
The Fields to Store Behind the Receipt
Store the source fields underneath every printed document: invoice number, completion timestamp, approval history, technician, VIN or plate, both odometer readings, part identifiers, tax jurisdiction, payment method and any void or refund history. A voided receipt stays in the record with its reason attached. Deleting it removes the explanation along with the mistake.
Reconcile daily receipt totals against deposits and processor reports, and let corrections happen through credit notes or revisions rather than by editing a closed invoice in place. A shop that lets staff overwrite closed invoices ends up with customer copies, sales-tax figures and inventory counts that disagree with each other, and nobody can tell which one is wrong.
That's the difference between a printable form and a working system. For teams that want estimates, approvals and invoices moving through one record, the RedAppy invoice and receipt workflow shows how a template stops being a blank page, and the team can be reached through the RedAppy contact page to set up fields that match the states where the shop operates.
A receipt only holds up if the system behind it holds the same facts. RedAppy runs the estimate, the approval, the parts and the final invoice as one record, so the document a customer leaves with matches the job the technician finished, with labor times and diagnostic help from the built-in assistant when a line needs a number instead of a guess. Visit RedAppy to see how a template becomes a searchable service history instead of a form that gets retyped every time.
Ready to Transform Your Shop?
RedAppy helps auto repair shops create professional digital estimates with photos and videos, send them instantly via text or email, and get customer approvals in seconds. No credit card required to start.