
Automotive Digital Inspection Camera: A Shop Buyer's Guide
A service advisor is staring at a repair estimate while a customer asks the question every shop hears: “Can you show me?” A typed note about worn brakes, a hidden leak, or damage behind a panel rarely creates enough confidence for an immediate approval. An automotive digital inspection camera can turn that conversation into visual evidence, but only when the camera fits a larger digital vehicle inspection workflow.
The buying mistake is treating a borescope as a standalone gadget. The camera captures the finding. The inspection platform organizes the image, attaches it to the repair order, sends it to the customer, and records the approval. Shops should buy the hardware and workflow together.
Table of Contents
- What an Automotive Digital Inspection Camera Actually Does in a Shop
- The Core Components Behind Every Digital Inspection Camera
- Key Specs and Features That Matter When You Buy
- How the Camera Fits Into a Digital Vehicle Inspection Workflow
- Real-World Use Cases in Shops and Mobile Service
- Maintenance, Durability, and Total Cost of Ownership
- Recommended Cameras by Shop Type and How to Justify the Spend
What an Automotive Digital Inspection Camera Actually Does in a Shop
A customer is reviewing a brake estimate and asks, “Can you show me?” The technician's answer should be a clear image, not a longer explanation. An automotive digital inspection camera guides a flexible probe behind a wheel, through an engine passage, behind a dashboard, or into another restricted opening. It sends a live view to a display, where the technician can save a still image or short video for the repair order.
The camera's practical job is to make an inaccessible defect visible. That evidence can eliminate unnecessary disassembly, reduce reliance on technical descriptions, and give the service advisor something concrete to present. The tool earns its place when it shortens the path from finding to customer decision.
A brake inspection shows the workflow. The technician records a worn pad or scored rotor. The advisor attaches the image to the matching estimate line. The customer reviews the recommendation on a phone or tablet. The process described by replaces paper checklists with real-time documentation that passes from technician to service writer and then to customer approval.
Evidence has to reach the estimate
An SD-card camera can record a finding, but storage alone leaves someone responsible for transferring, naming, and attaching each file. That manual work creates delays during a busy dispatch period. For a shop that wants measurable results, choose a camera that works with the same customer-facing inspection process used for photos, videos, notes, and repair recommendations.
A borescope alone is enough when the job only requires internal visibility and the technician can document the result without extra handling. Pair it with mobile inspection software when the image must reach an advisor, customer, repair order, and approval step. Review to see how visual findings can move through a structured inspection process.
The commercial case depends on that handoff. One industry summary reports that inspections containing 20 or more pictures produced an average repair order value 30.4% higher than inspections with five or fewer pictures, as reported in this. The figure does not guarantee the same result from every camera purchase. It does show why image capture belongs in the sales and trust process, not only in diagnosis.
Practical rule: If the camera creates evidence but does not help the advisor present it, the shop has purchased half a solution.
The Core Components Behind Every Digital Inspection Camera
An automotive inspection camera works much like a medical endoscope. A physician guides a narrow camera through a restricted path to view an internal surface. A technician guides a probe through an engine bay, behind a dash, into an intake tract, or around a concealed component. In both cases, the useful result depends on access, lighting, image quality, and control.
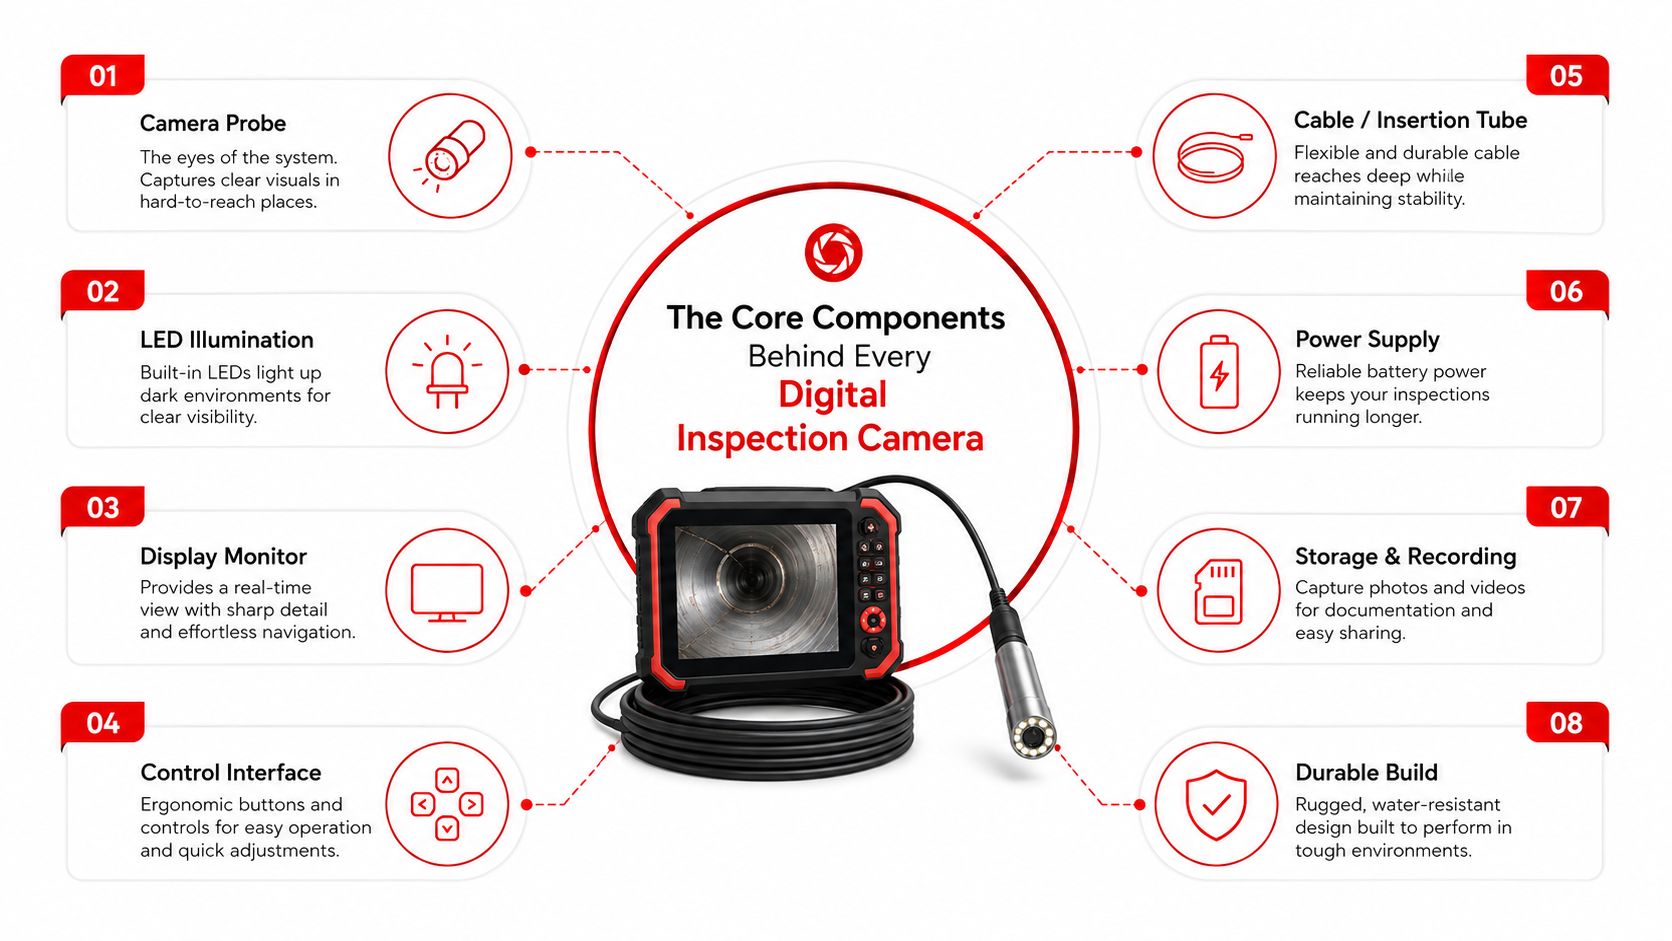
The probe determines where the camera can go
The insertion probe may be rigid, flexible, or semi-rigid. A semi-rigid shaft often gives technicians the right balance, it bends around obstacles but holds enough shape to steer through a cavity. Flexible probes work well around complicated routes, while rigid sections can improve control during straight-line inspection.
The camera head diameter matters more than many buyers expect. Thin heads around 3.9 to 6.0 mm suit spark-plug wells and other narrow passages, while 6.0 to 9.0 mm probes generally serve broader engine-bay work. The explains the central compromise, smaller heads improve reach but usually leave less room for optics and illumination.
Tip articulation adds another layer of control. A steerable tip lets the technician aim around a corner without twisting the entire cable. That feature costs more, but it earns its place when the shop regularly inspects behind panels, around bends, or inside cavities where a forward-facing lens can't see enough.
The sensor and lighting create the usable image
Most modern units use CMOS sensors because they support compact designs and efficient digital processing. CCD sensors can still appear in specialist equipment, but the buying decision should focus less on the label and more on the final image in the shop's actual inspection locations.
The illumination ring supplies the light that the sensor needs. LED count, beam spread, color balance, and brightness control all affect whether the image shows a defect or only a reflective blur. Adjustable brightness is essential because a dark cavity needs more light, while a shiny metal surface can become unreadable when the LEDs are at full power.
The controller processes the signal and gives the technician a way to capture stills, record video, adjust lighting, and steer the probe. A built-in screen favors immediate use in the bay. A wired USB output can simplify connection to a tablet or laptop. A wireless transmitter offers more freedom, but it introduces battery management and compatibility questions.
Before buying, the shop should decide where the file must end up. A camera that sends a clear image to a phone but cannot connect cleanly to the inspection platform may create more administration than it removes.
Key Specs and Features That Matter When You Buy
The correct camera isn't the one with the biggest resolution claim. It's the one that reaches the shop's common inspection points, illuminates them properly, survives contamination, and moves evidence into the repair order without a workaround.
Match probe geometry to the inspection jobs
Thin probes are the choice for spark-plug wells, narrow ports, and tight passages. Larger probes can provide stronger illumination and more room for optics, but they may not enter the opening that matters. Probe length follows the same logic. A short cable suits bench or engine-bay work, while longer probes help with deep cavities, underbody routes, and mobile inspections.
Tip articulation deserves a premium when technicians regularly need side views. A straight probe is adequate for direct inspection. A steerable head is better when the defect sits beyond a bend or behind an obstruction.
Resolution should be judged by the final customer image. A basic feed can help a technician locate a problem, but a sharper image makes estimate attachments more persuasive. The shop should test still-image clarity, glare control, focus distance, and low-light performance rather than choosing a model from resolution alone.
Use this practical comparison
| Spec | Entry Tier | Shop Standard | Premium |
|---|---|---|---|
| Probe diameter | Thin wired probe for restricted access | General-purpose diameter with stronger lighting | Narrow or dual-camera design with articulation |
| Probe construction | Flexible cable | Semi-rigid, replaceable sheath | Rugged articulated probe |
| Image output | Basic live view and still capture | Clear stills and short videos for inspection reports | High-detail capture with stronger zoom and control |
| Lighting | Fixed LED brightness | Adjustable LED ring | Adjustable lighting with side-view or mirror accessories |
| Connectivity | Direct USB | USB plus supported mobile connection | Wireless transmission with software integration |
| Protection | Splash resistance | IP67 target for shop exposure | Rugged housing and replaceable components |
| Display | Phone or tablet | Dedicated screen or shop tablet | Bright dedicated monitor plus mobile workflow |
For oil, coolant, and dirty cavities, buyers should favor an IP67-rated probe or housing rather than accepting vague “water-resistant” language. Shops comparing hardware can when protection and a dedicated display matter more than phone-only operation.
Connectivity can make or break adoption
Wi-Fi offers a practical bridge to tablets, but it can introduce latency and battery drain. Bluetooth is useful for pairing and control, yet it isn't always the right channel for transferring larger video files. Direct USB usually provides the simplest connection, although the cable can restrict movement and device compatibility.
Before purchase, managers should score each camera against the shop's top three inspection jobs:
- Access: Can the probe reach the most common hidden components?
- Evidence: Will the saved image be clear enough for a customer-facing report?
- Workflow: Can the file reach the chosen inspection software without manual copying?
- Durability: Can the probe handle fluids, heat, abrasion, and daily handling?
- Control: Can a technician operate the camera with one hand when the other hand is guiding the probe?
The highest-scoring camera is usually a better investment than the most expensive model.
How the Camera Fits Into a Digital Vehicle Inspection Workflow
A camera pays back at the counter only when the technician's evidence arrives with the recommendation. A clean handoff looks like this:
- The technician frames the finding with the probe.
- The technician captures a still image and, when useful, a short narrated video.
- The file transfers through Wi-Fi or USB into the digital vehicle inspection application.
- The advisor tags the media to the matching estimate line.
- The customer receives the inspection report with the image and technician note.
- The customer approves or declines the work from the report.
A describes the broader format, which commonly uses a smartphone or tablet to combine photos, videos, notes, and repair-order links. The camera adds value when it captures evidence that ordinary phone photography can't reach.
The file path matters more than the camera menu
A valve cover gasket leak illustrates the difference. A technician can describe oil residue in a note, or capture the exact leak path with a probe and attach it to the gasket replacement line. The second option gives the advisor something concrete to present, especially when the customer isn't standing beside the vehicle.
A camera that saves only to an SD card creates a separate administrative task. A camera with an open API, SDK support, or a documented integration path can push files into platforms such as Tekmetric, Shop-Ware, or AutoVitals. Compatibility should be confirmed before purchase, because a technically excellent camera can still become a poor shop tool if its media cannot enter the existing inspection process.
Managers should measure three outcomes after deployment:
- Average repair order value: Does stronger documentation support more complete recommendations?
- Approval rate: Do customers accept flagged work more often when they can see the defect?
- Advisor time: Does visual evidence reduce repetitive typed explanations and follow-up calls?
The PartsTech data cited earlier connects richer photo documentation with higher average repair order value. The operational lesson is straightforward. Capture quality matters, but handoff quality determines whether the image produces action.
Real-World Use Cases in Shops and Mobile Service
A single-bay garage and a mobile service operation shouldn't buy the same camera. Their access problems, power options, handling habits, and documentation demands are different.
The fixed-bay independent garage
A garage focused on drivability, brake, and engine work can usually start with a thin semi-rigid USB probe and a shop tablet. That setup suits spark-plug access, confined engine-bay spaces, belt routing, hidden corrosion, and areas behind trim. Tethering isn't a serious drawback when the tablet already sits on the diagnostic cart.
The owner should prioritize a replaceable probe, adjustable lighting, simple still capture, and direct compatibility with the existing inspection application. Articulation is useful, but it shouldn't displace access diameter or image clarity if the shop's most common jobs require a narrow head.
The mobile and multi-bay operation
A multi-bay shop with a mobile van needs a more self-contained kit. Wireless transmission, a dedicated monitor, magnetic mounting, one-hand controls, a rechargeable battery, and a protective case all become more important when the technician works away from a stable cart.
| Feature | Single-Bay Garage | Multi-Bay with Mobile Van |
|---|---|---|
| Probe | Thin semi-rigid USB probe | Wireless articulating probe |
| Display | Existing shop tablet | Dedicated monitor plus field tablet |
| Power | USB from laptop or tablet | Rechargeable battery |
| Housing | Standard shop protection | Rugged case for transport |
| Mounting | Bench or diagnostic cart | Magnetic mount for roadside use |
| Workflow | Direct upload to inspection software | Wireless transfer and mobile reporting |
| Priority | Low setup friction | One-hand operation and durability |
The under-automation problem remains real. A 2021 national survey cited by reported that 60% of dealership tire checks were still performed visually, while only 6% of service departments used an automated system. The same survey found 45% of service workers believed the tire inspection system could identify severe issues and improve safety. For shop managers, the lesson is not to automate every inspection blindly. It's to identify where camera evidence can replace inconsistent visual checks and strengthen documentation.
Maintenance, Durability, and Total Cost of Ownership
The purchase price tells only part of the story. Probe damage, fluid contamination, lens scratches, battery failure, software compatibility, and downtime determine whether a camera remains useful after the novelty disappears.
A maintenance routine should be simple enough for technicians to follow. After each job, the operator should wipe the lens, inspect the tip, and remove oil or coolant from the sheath. A monthly sheath check can catch cuts before fluid reaches the internal conductors. Firmware updates should happen on a regular quarterly cycle, while wireless battery health deserves a documented check every six months.
The expensive parts are often replaceable
A replaceable probe can protect the controller investment, but replacement pricing matters. Some suppliers sell probe-only replacements at a substantial share of a complete kit's price, so managers should request the replacement cost before signing off on the original purchase. Warranty length also needs scrutiny. Coverage may differ sharply between the display, controller, battery, cable, and camera head.
IP-rated protection is more meaningful than a general splash-proof claim. The shop should verify what the rating covers and whether the probe, controller, connectors, and charging ports receive the same protection. A camera used around oil and coolant needs a cleaning and storage process, not just a label on the box.
Compare ownership by risk, not sticker price
| Cost Factor | Economy Tethered Kit | Mid-Tier Wireless Kit |
|---|---|---|
| Initial purchase | Lower entry cost | Higher initial cost |
| Power | Draws from connected device | Requires charging and battery management |
| Replacement exposure | Cable and probe wear | Probe, battery, wireless module, and housing wear |
| Downtime risk | Lower battery risk, tether limits movement | Greater battery dependence, better mobility |
| Workflow fit | Often simpler through USB | Depends on app and platform compatibility |
| Technician preference | Good for fixed-bay work | Better for field and multi-bay use |
| Long-term decision | Favorable when use is occasional | Favorable when mobility and documentation are frequent |
The right choice depends on usage frequency and workflow value. A cheap camera that stays in a drawer costs more than a modestly priced unit used on every relevant inspection. Conversely, a wireless kit adds little value to a fixed workstation if the shop never needs mobility.
Recommended Cameras by Shop Type and How to Justify the Spend
Choose the camera bundle for the shop's service mix, bay layout, and inspection workflow. A small garage needs quick access and low friction. A multi-bay operation needs consistent media from every technician. A mobile van needs equipment that works independently in exposed conditions.
Three buying profiles
Single-bay independent garage: Choose a wired borescope with a narrow probe, LED ring, and USB-C tablet connectivity. Prioritize access to tight engine and undercarriage locations, then simple photo and video capture. Mid-resolution is enough if the image is clear, properly lit, and easy to attach to the inspection report. A borescope alone can cover occasional evidence gathering, but it will not organize approvals or follow-up work without inspection software.
Multi-bay shop with multiple advisors: Choose longer probes, stronger lighting, and a platform-compatible camera bundle for shared tablets. Dual-camera heads help technicians capture forward and side views, yet integration and repeatable procedures matter more than an impressive specification sheet. Every advisor should receive the same media structure on the repair order, so the camera must fit the shop's digital vehicle inspection workflow.
Mobile or roadside service van: Choose a rugged wireless unit with rechargeable power, magnetic mounting, one-hand controls, and a tablet that uploads inspection reports from the field. Inspect the case, battery access, and connection stability as closely as the lens. A fragile premium camera is a poor mobile tool, even when its image quality is impressive.
| Spec | Single-Bay Garage | Multi-Bay Shop | Mobile Service |
|---|---|---|---|
| Probe | Narrow wired probe | Longer probe with optional dual camera | Rugged wireless articulating probe |
| Display | Existing tablet | Shared dedicated tablets | Dedicated monitor and field tablet |
| Connection | USB-C | Platform-compatible wired or wireless | Wireless with dependable mobile upload |
| Lighting | Adjustable LED ring | High-output adjustable lighting | Adjustable lighting with fast controls |
| Protection | Standard fluid resistance | Replaceable sheath and serviceable parts | Rugged case and protected connectors |
| Workflow | Direct inspection-report attachment | Centralized DVI media and repair orders | Field report with immediate customer delivery |
Build the payback case around approved work
The PartsTech figure cited earlier, inspections with 20 or more pictures correlating with a 30.4% higher average repair order value than inspections with five or fewer, sets a benchmark, not a promise. Track the shop's approval rate, average repair order value, and advisor time before and after deployment. The camera earns its keep only when technicians use it and advisors present the evidence consistently.
RedAppy supports digital inspections with reports that can include photos and videos, plus estimates, invoicing, payments, parts ordering, analytics, and a digital shop board. Review RedAppy's features before selecting hardware that must feed the platform. The goal is a connected workflow from camera capture to customer approval and repair order, not another device sitting in a drawer.
Approve a higher camera cost when it is used consistently, reduces unnecessary disassembly, and gives customers evidence they can understand. Before buying, identify the top inspection jobs, required probe geometry, media handoff, and metric that will prove adoption. A camera should support the workflow, not become the workflow.
Visit RedAppy to see how photo and video inspections can connect with estimates, customer approvals, repair orders, and shop operations. Contact RedAppy through its shop consultation page to map a camera workflow for a single-bay garage, mobile service setup, or multi-location operation.
Ready to Transform Your Shop?
RedAppy helps auto repair shops create professional digital estimates with photos and videos, send them instantly via text or email, and get customer approvals in seconds. No credit card required to start.